
How to Use
IMPORTANT SAFETY INSTRUCTIONS
Read All Instructions Before Using This Machine
CAUTION: KEEP EQUIPMENT AND CLEANING COMPOUNDS OUT OF REACH OF CHILDREN.
- Use indoors only. DO NOT expose to rain or freezing temperatures, including while transporting. Store indoors.
- This machine is intended for carpet and upholstery cleaning only! Use cleaning compounds designed for hot water extraction carpet and upholstery cleaning machines.
- If machine is not working properly, has been dropped, damaged, or immersed in water, return it to rental location and notify personnel of the problem.
- DO NOT use with damaged cord or plug. DO NOT pull or carry by cord, use cord as a handle, close door on cord, or pull cord around sharp edges or corners. Keep cord away from heated surfaces.
- DO NOT place machine in standing water or try to clear flooded areas.
- DO NOT handle plug or equipment with wet hands.
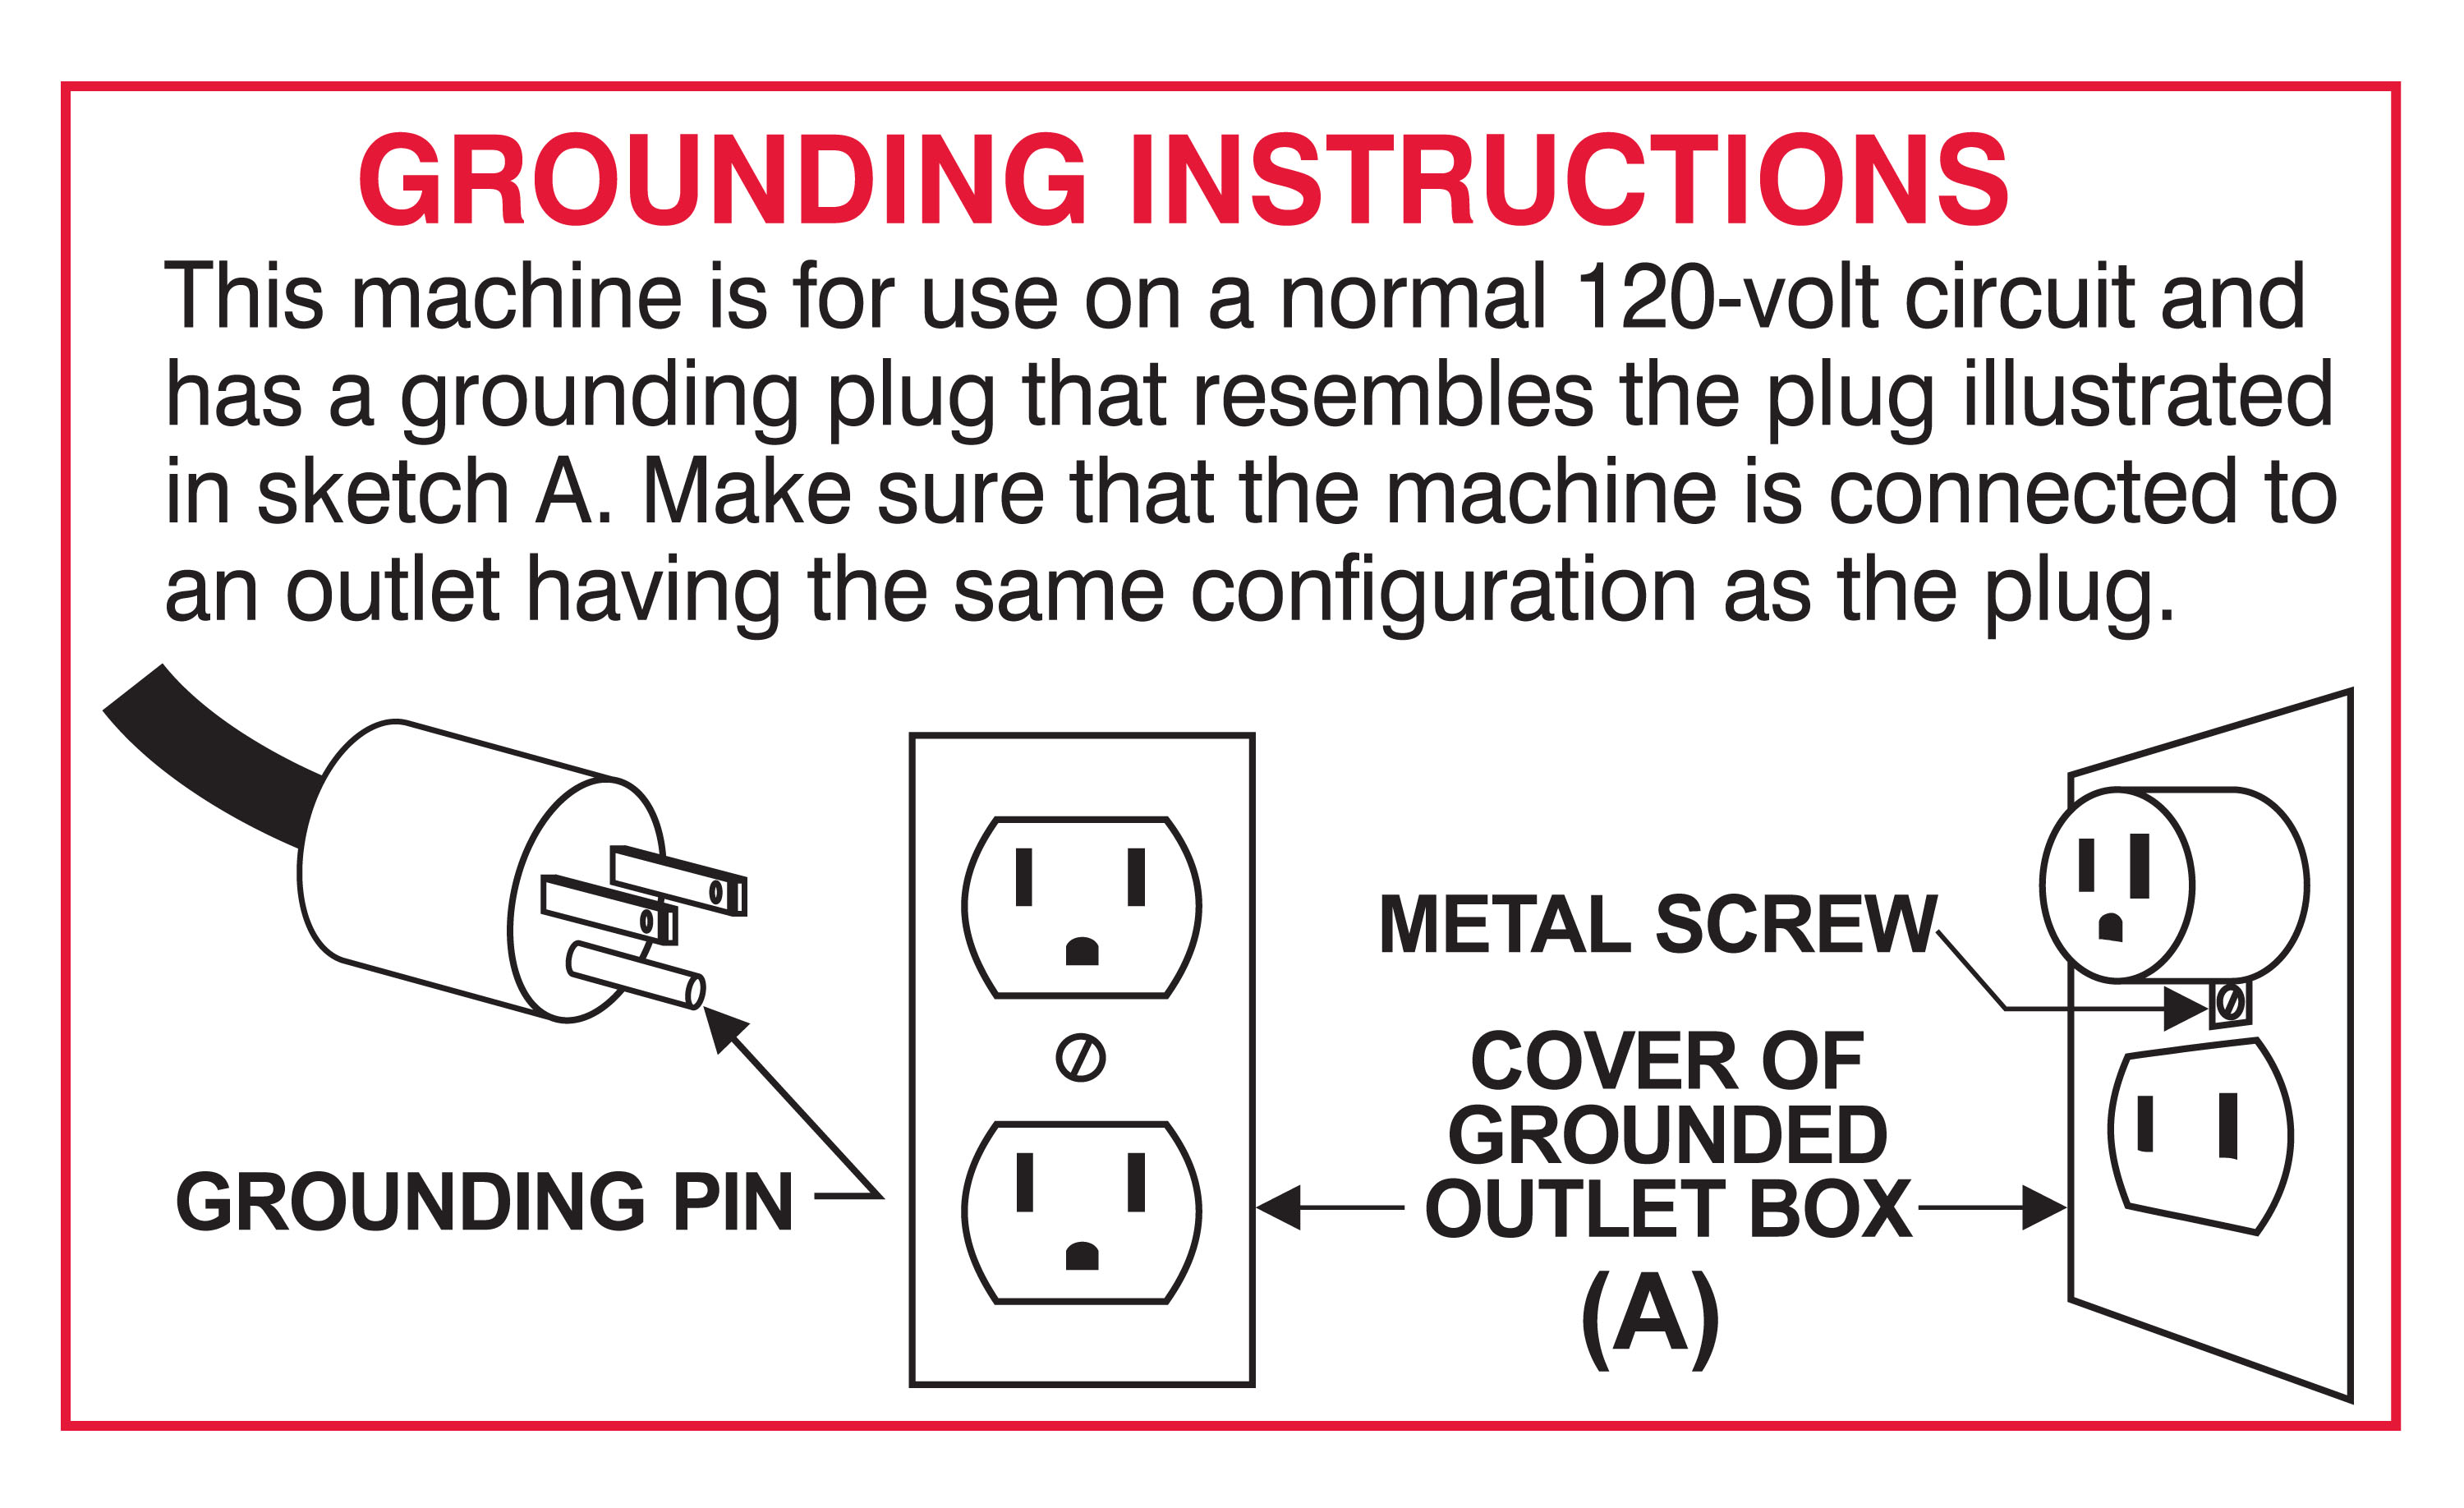
- Connect to a properly grounded outlet only.
- Turn off all controls before unplugging.
- Never vacuum solvents, gasoline or other hazardous liquid or solid material or use in areas where they may be present.
- DO NOT pick up anything that is burning or smoking, such as cigarettes, matches or hot ashes.
- Use extra care when cleaning stairs.
- Do not leave the machine while plugged in. Unplug it from the outlet when not in use and before servicing.
- Do not put any object into appliance openings. Do not use with any openings blocked; keep free of dust, lint, hair, and anything that may reduce airflow.
- Do not clean over floor electrical outlets.
- The use of an extension cord is not recommended.
Preparing Room, Carpet and Upholstery
- Move Furniture to center of the room so the perimeter can be cleaned first for best results. Move furniture back, then clean the center of the room. If the carpet is still damp when returning furniture, place foil under furniture until carpet is totally dry.
- Vacuum carpet or upholstery with your home vacuum cleaner. This machine is not a vacuum cleaner. We recommend vacuuming carpet thoroughly, making four passes with a CRI approved vacuum cleaner.
- Pre-treatgeneral spots with 7 IN 1 Carpet Care. Pre-treat odors, pet, acid based and general spots with 7 IN 1 Spot & Odor Pet Formula, or SpotVortex Spot solution.
- Pre-treatheavily soiled areas of carpet, hallways, doorways and around furniture with 7 IN 1 Hi-Traffic Pre-Treatment.
- Note: Read and follow all cleaning solution label directions prior to use.
Cleaning Spots
- Remove surface liquids or solids with a paper towel or spoon. Saturate with water to dilute and suspend the spot. Use about 1 oz. of water per inch of spot; for example, use about 2 oz. of water for a spot 2 inches across.
- Saturate the spot with SpotVortex Spot solution or 7IN1 Spot & Odor. Scrub the spot well, working from the outside inward. Allow the Spot cleaner to dwell on the spot for 5 to 10 minutes.
- Attach the SpotVortex to the hose and attach the hose to the grey cuff at the back of the carpet cleaning machine.
- Turn ON the machine’s Suction Switch. Place the SpotVortex over the saturated area and apply downward pressure for 10 seconds. Leave the SpotVortex in place and allow the machine’s vacuum to run for about 1 minute, or until all liquid is removed. The clear cone allows you to see when the liquid is removed.
- Note: For specialty spots like urine, wax, ink see cleaning tips – Specialty Spots.
- Note: Some spots may require more attention. Repeat steps, if necessary, until the spot is removed.
- Cleaning: Remove the clear cone from the blue base and wash parts by hand with warm water.
- For best results: Use SpotVortex Spot solution or 7IN1 Spot & Odor. They have earned the Seal of Approval for Superior Cleaning from the Carpet and Rug Institute, signifying that they remove even the most difficult stains without any damage to carpet. Approved both as a general spotter and a pet stain and odor remover.
- Tip: Use the SpotVortex teardrop shaped base for removing spots in corners or along walls.
- Tip: Also use the SpotVortex on area rugs, stairs, and washable fabrics. Test color fastness of area rugs and fabrics prior to cleaning. When cleaning rugs on wood floors, make sure any liquid is wiped up with a towel after cleaning and pull back the cleaned area of the rug from the floor, until totally dry.
- Tip: For even faster drying, place a fan directed toward the cleaned area.
- For an instructional video and a spot removal guide for pet and other difficult to remove spots go tospotvortex.com.
Prepaing Machine
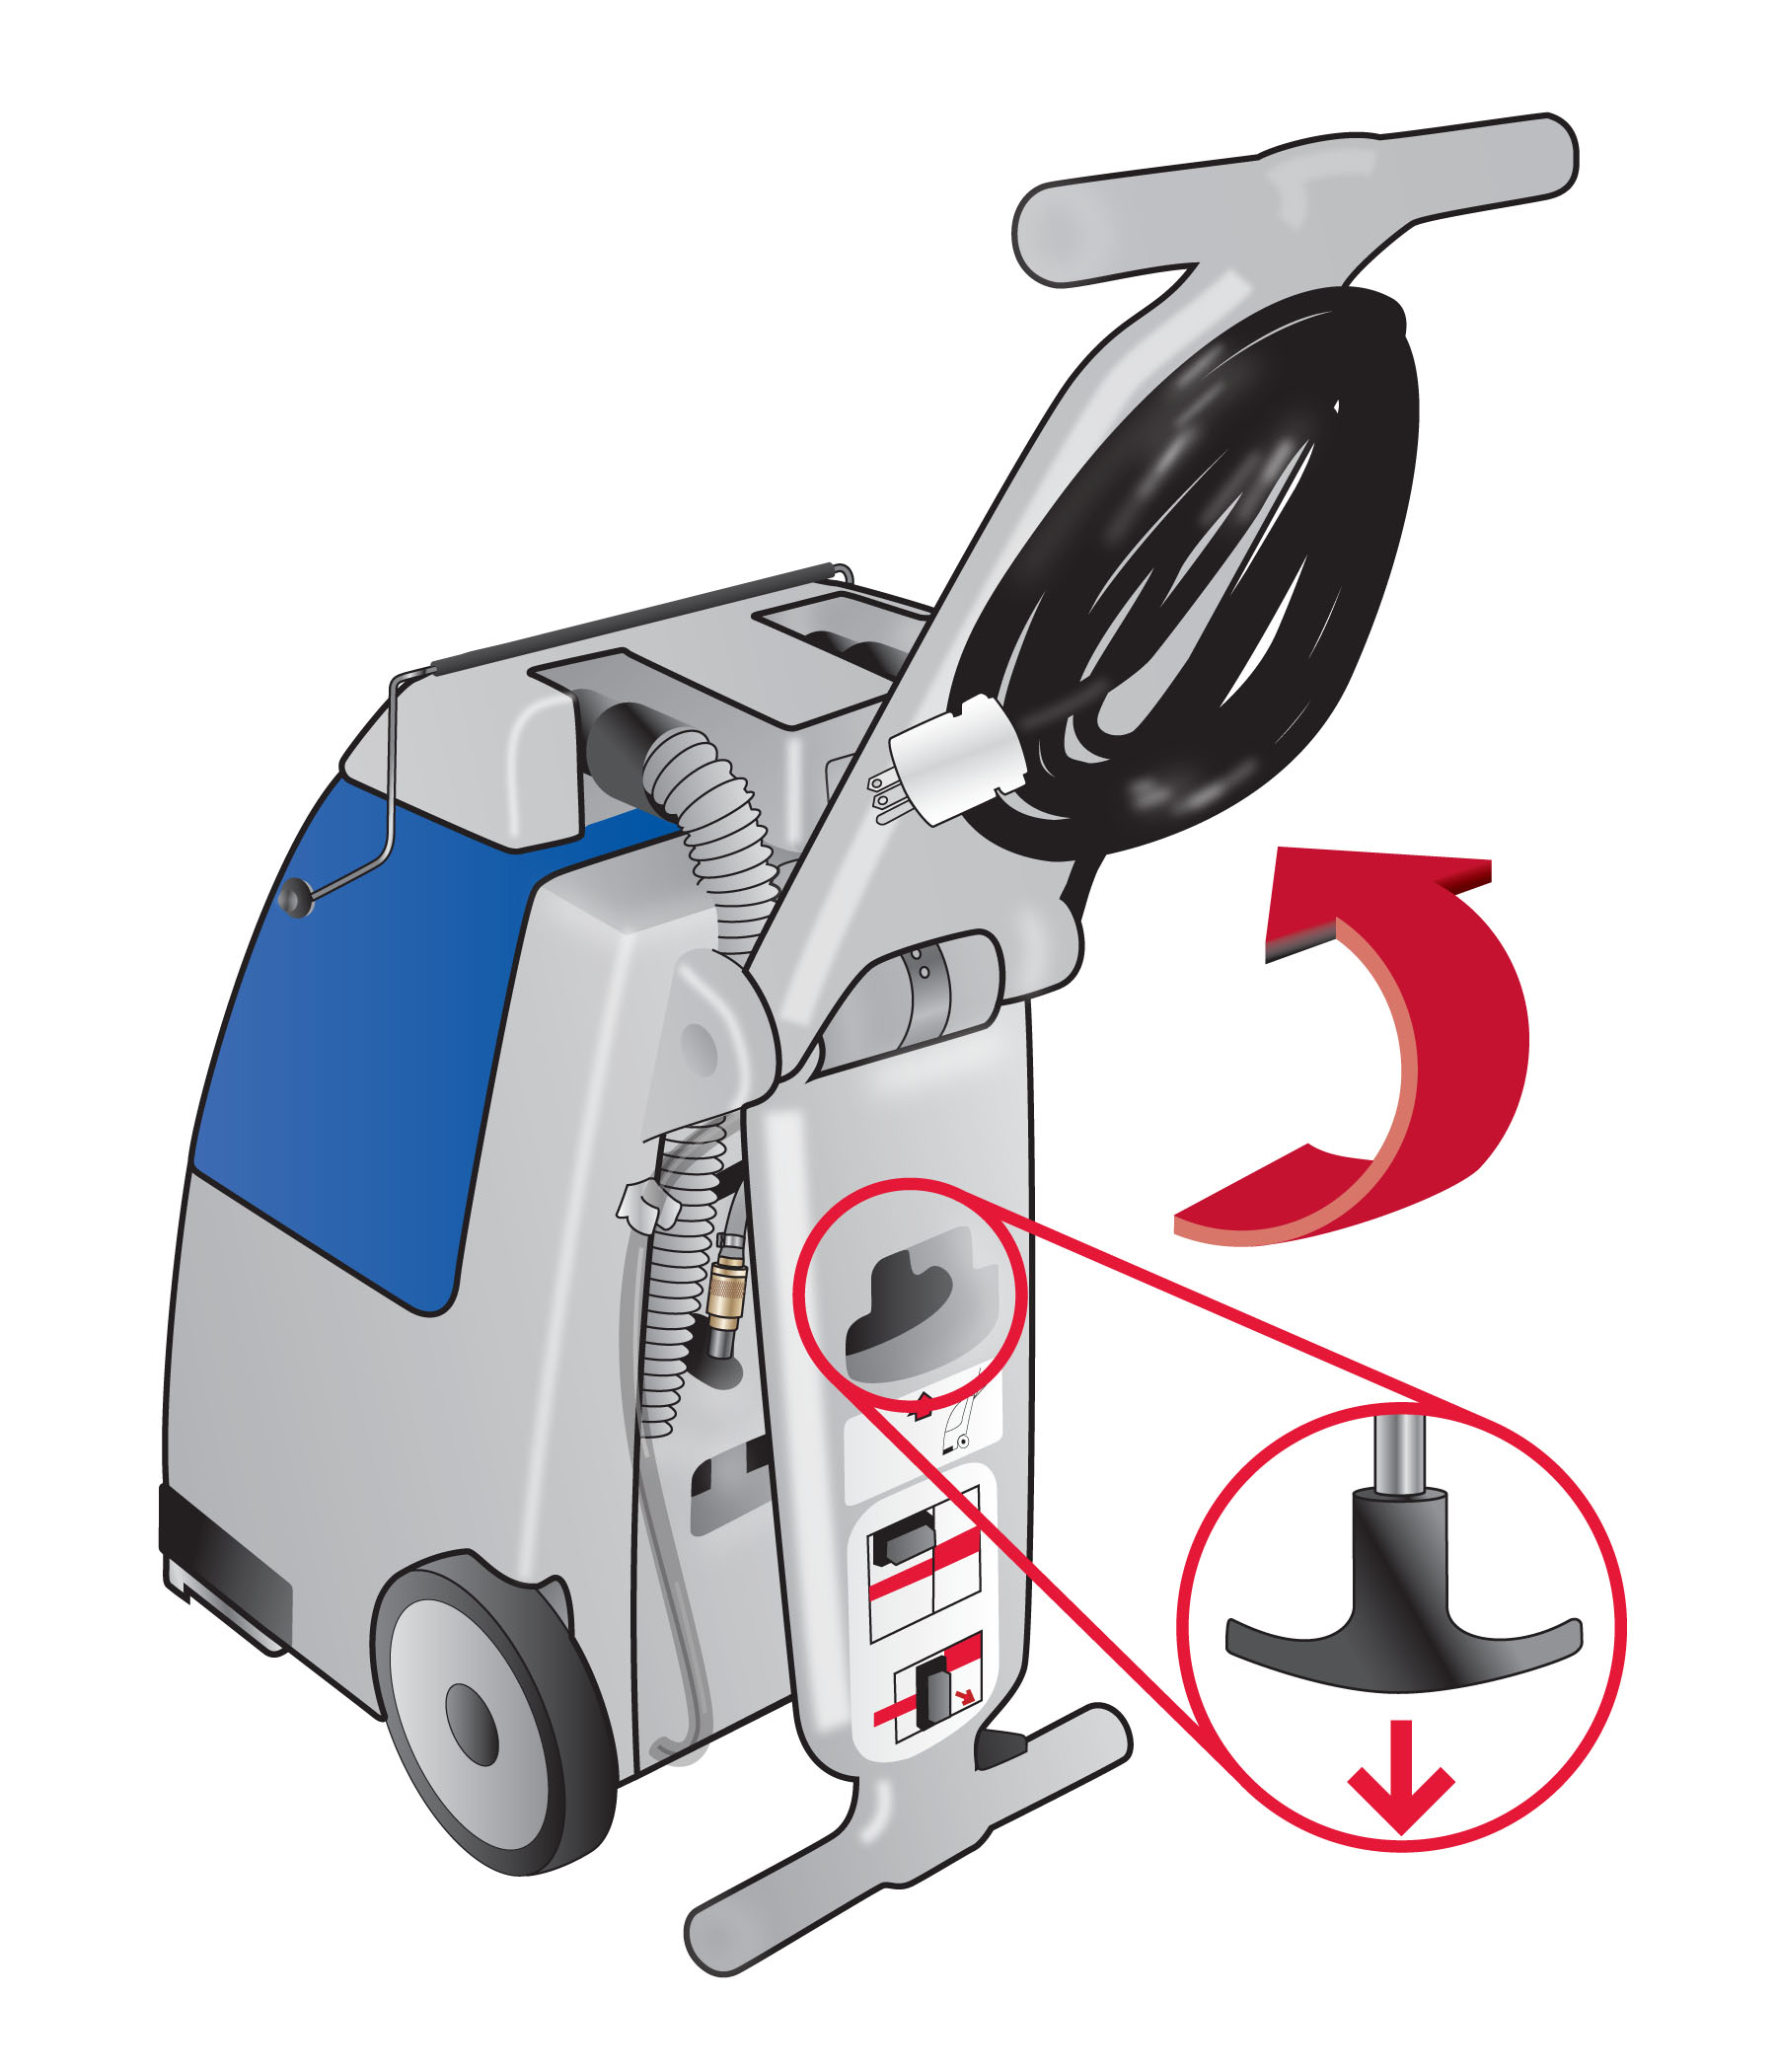
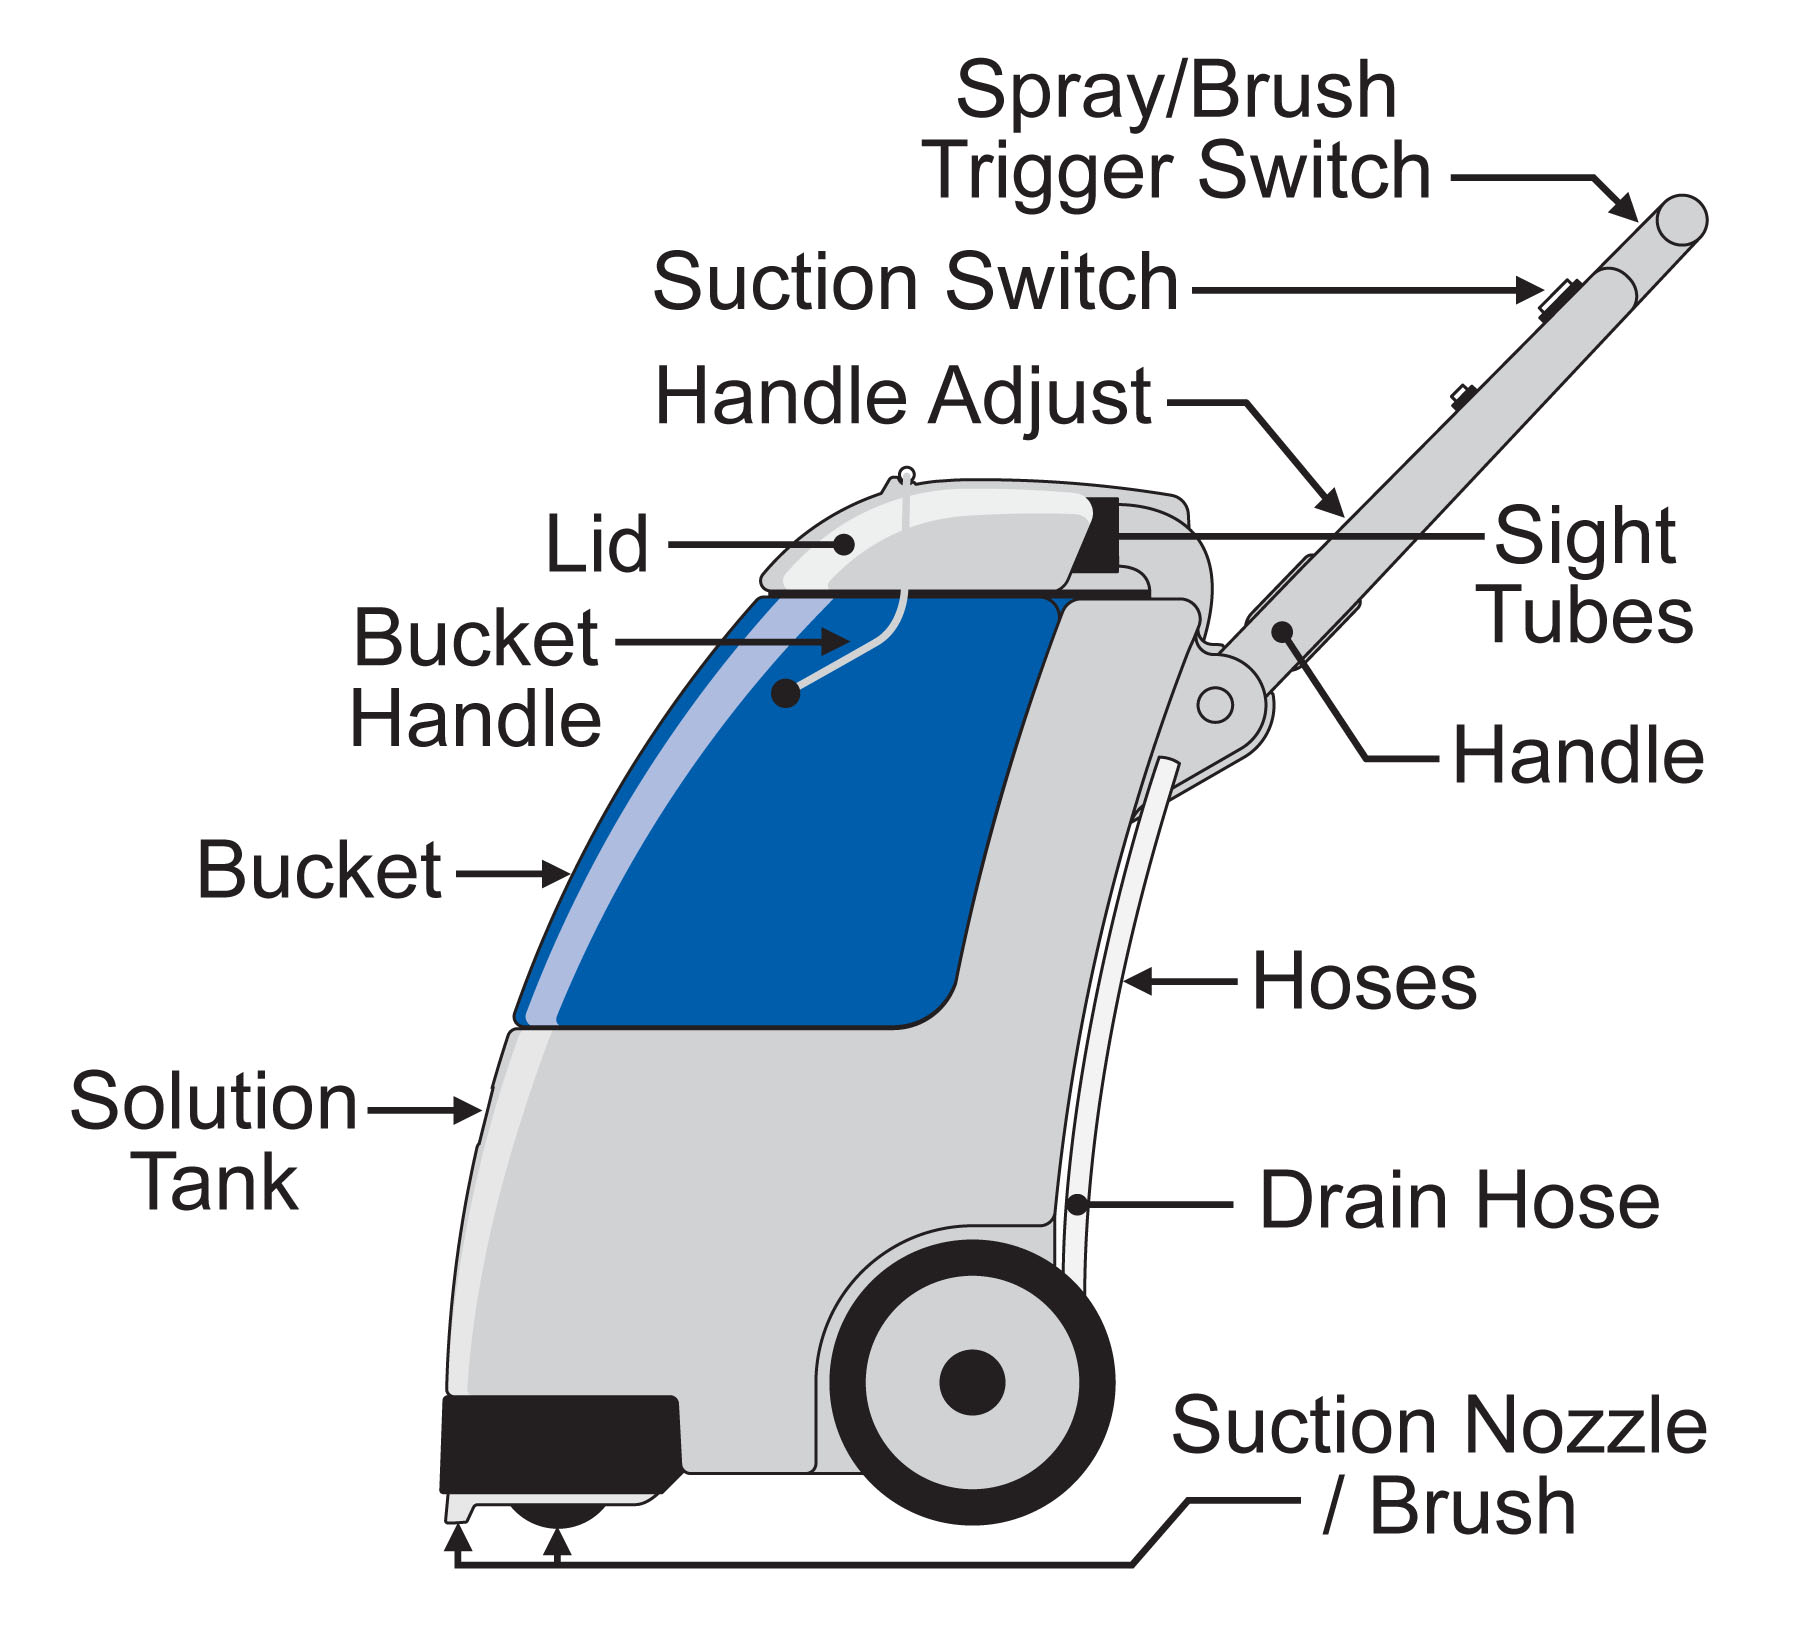
- Pull the black “T” Handle on the gray Machine Handle and raise the Machine Handle to desired height.
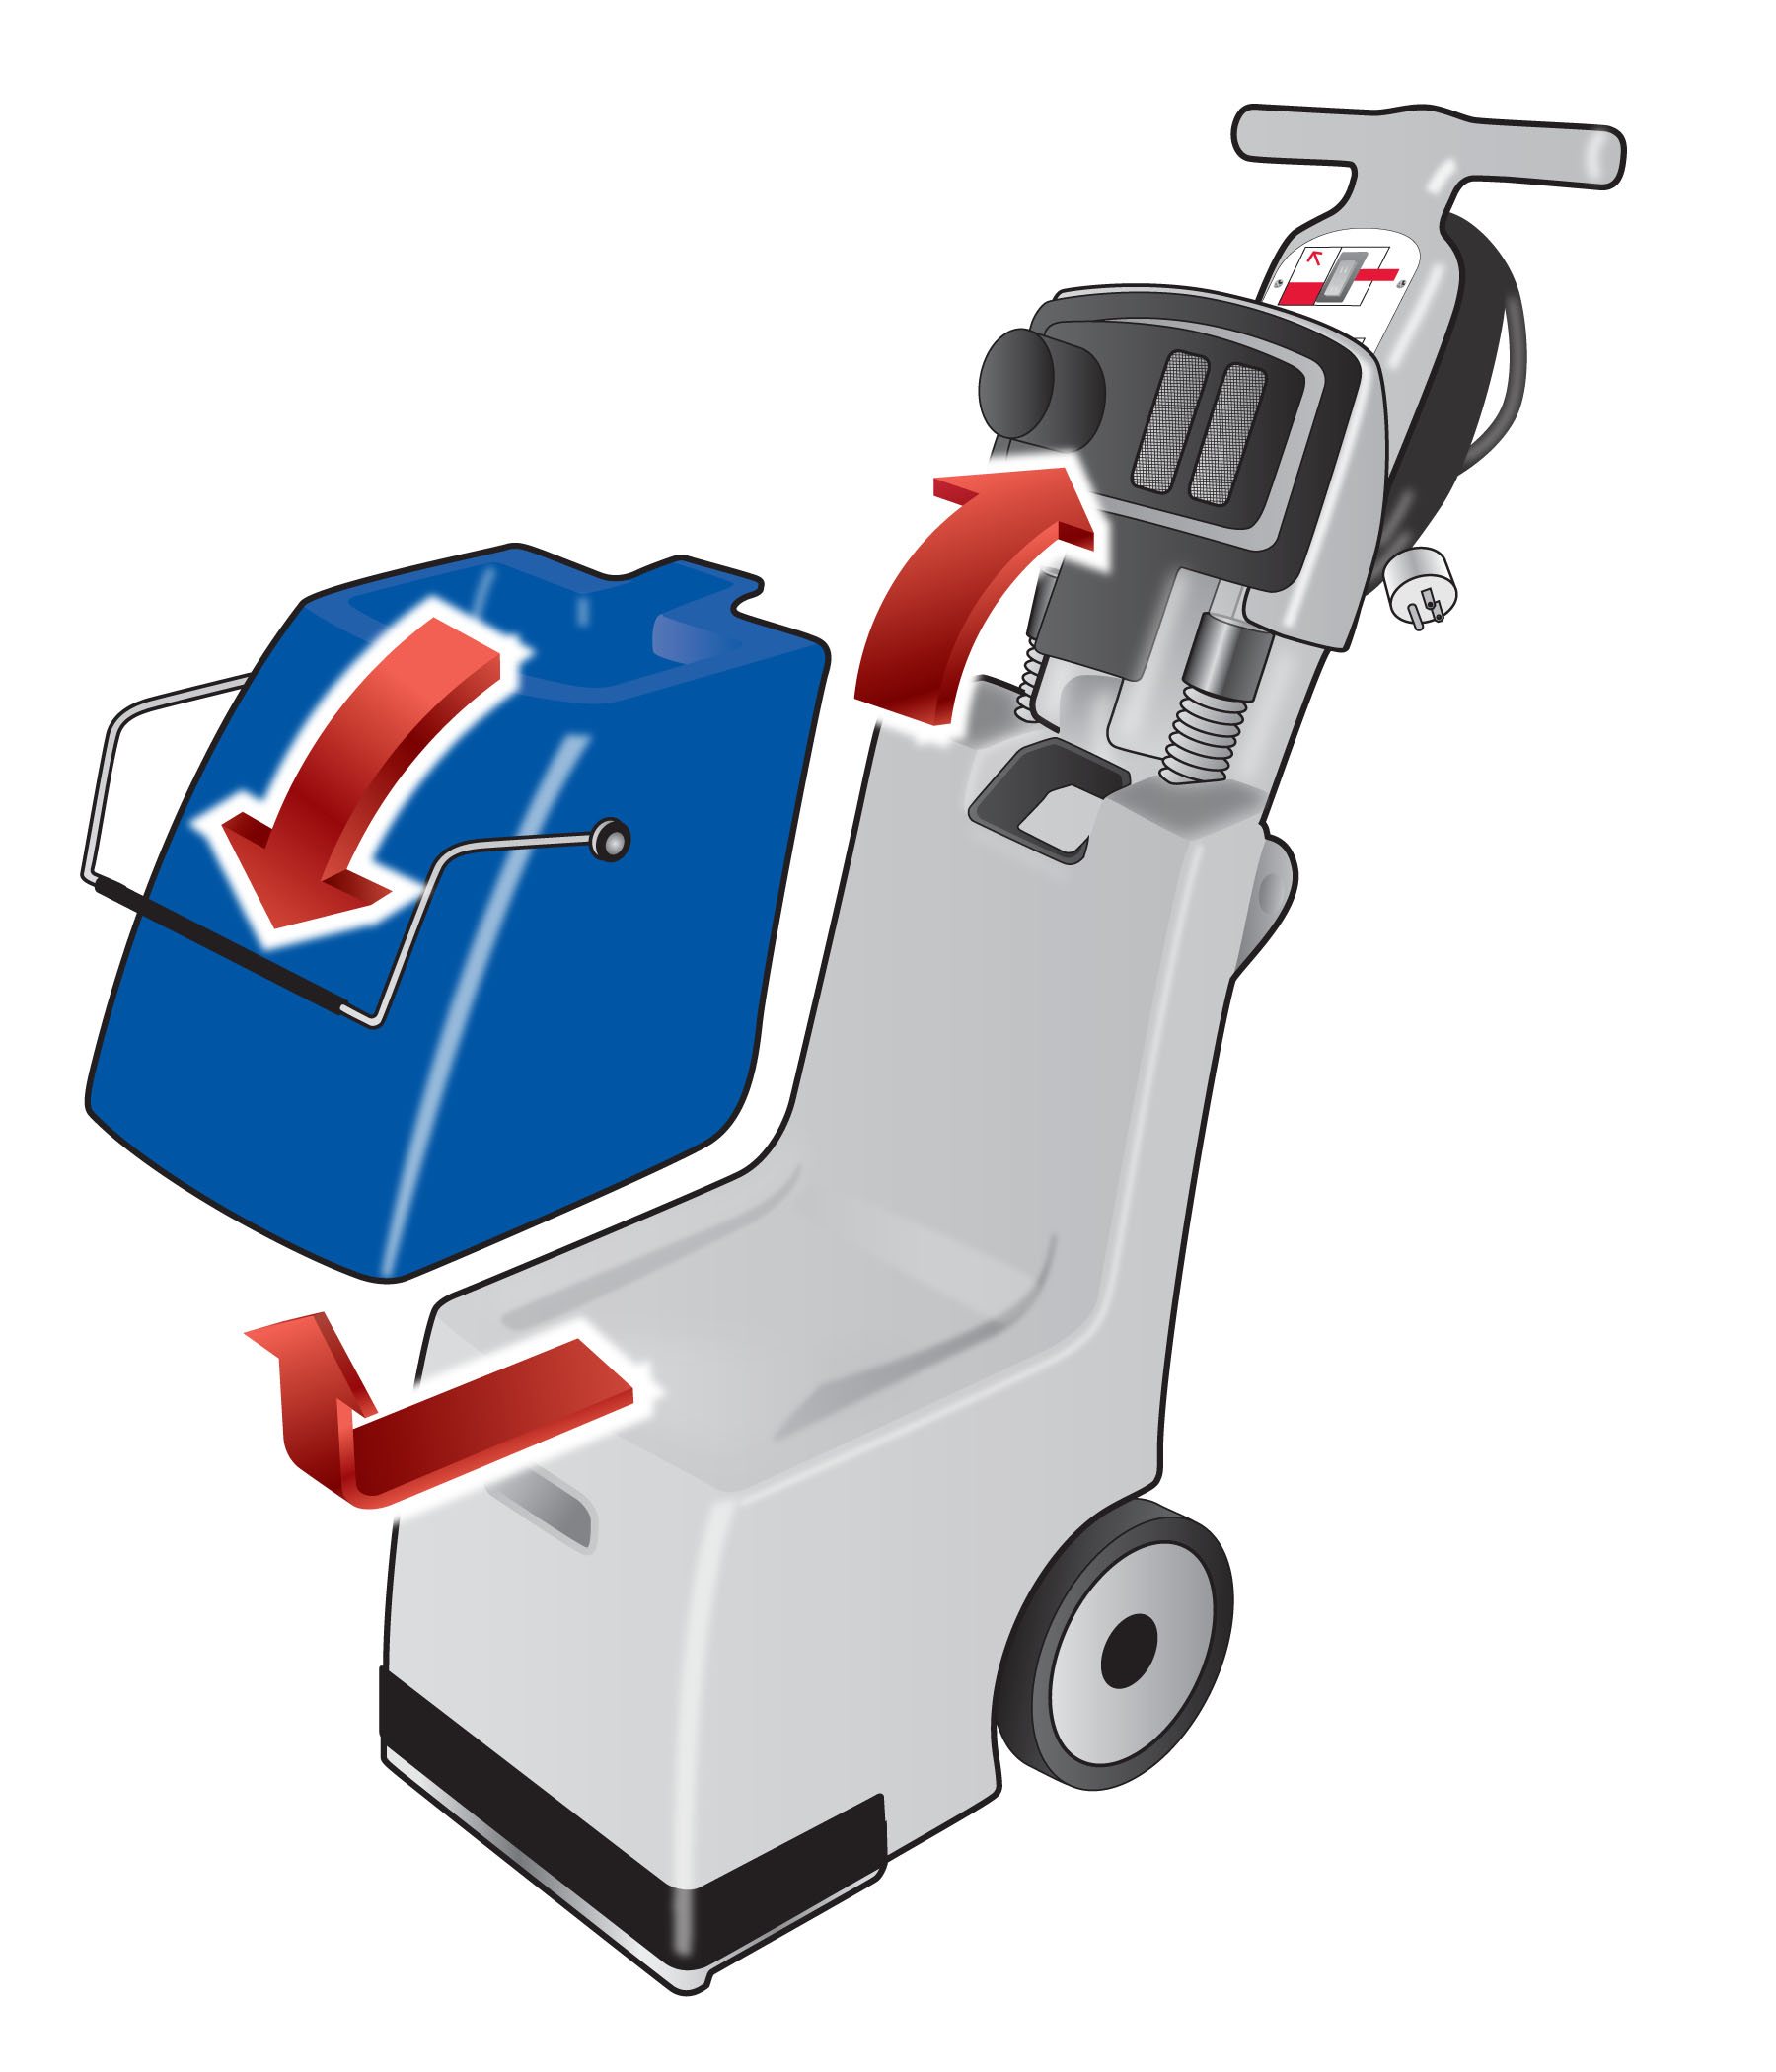
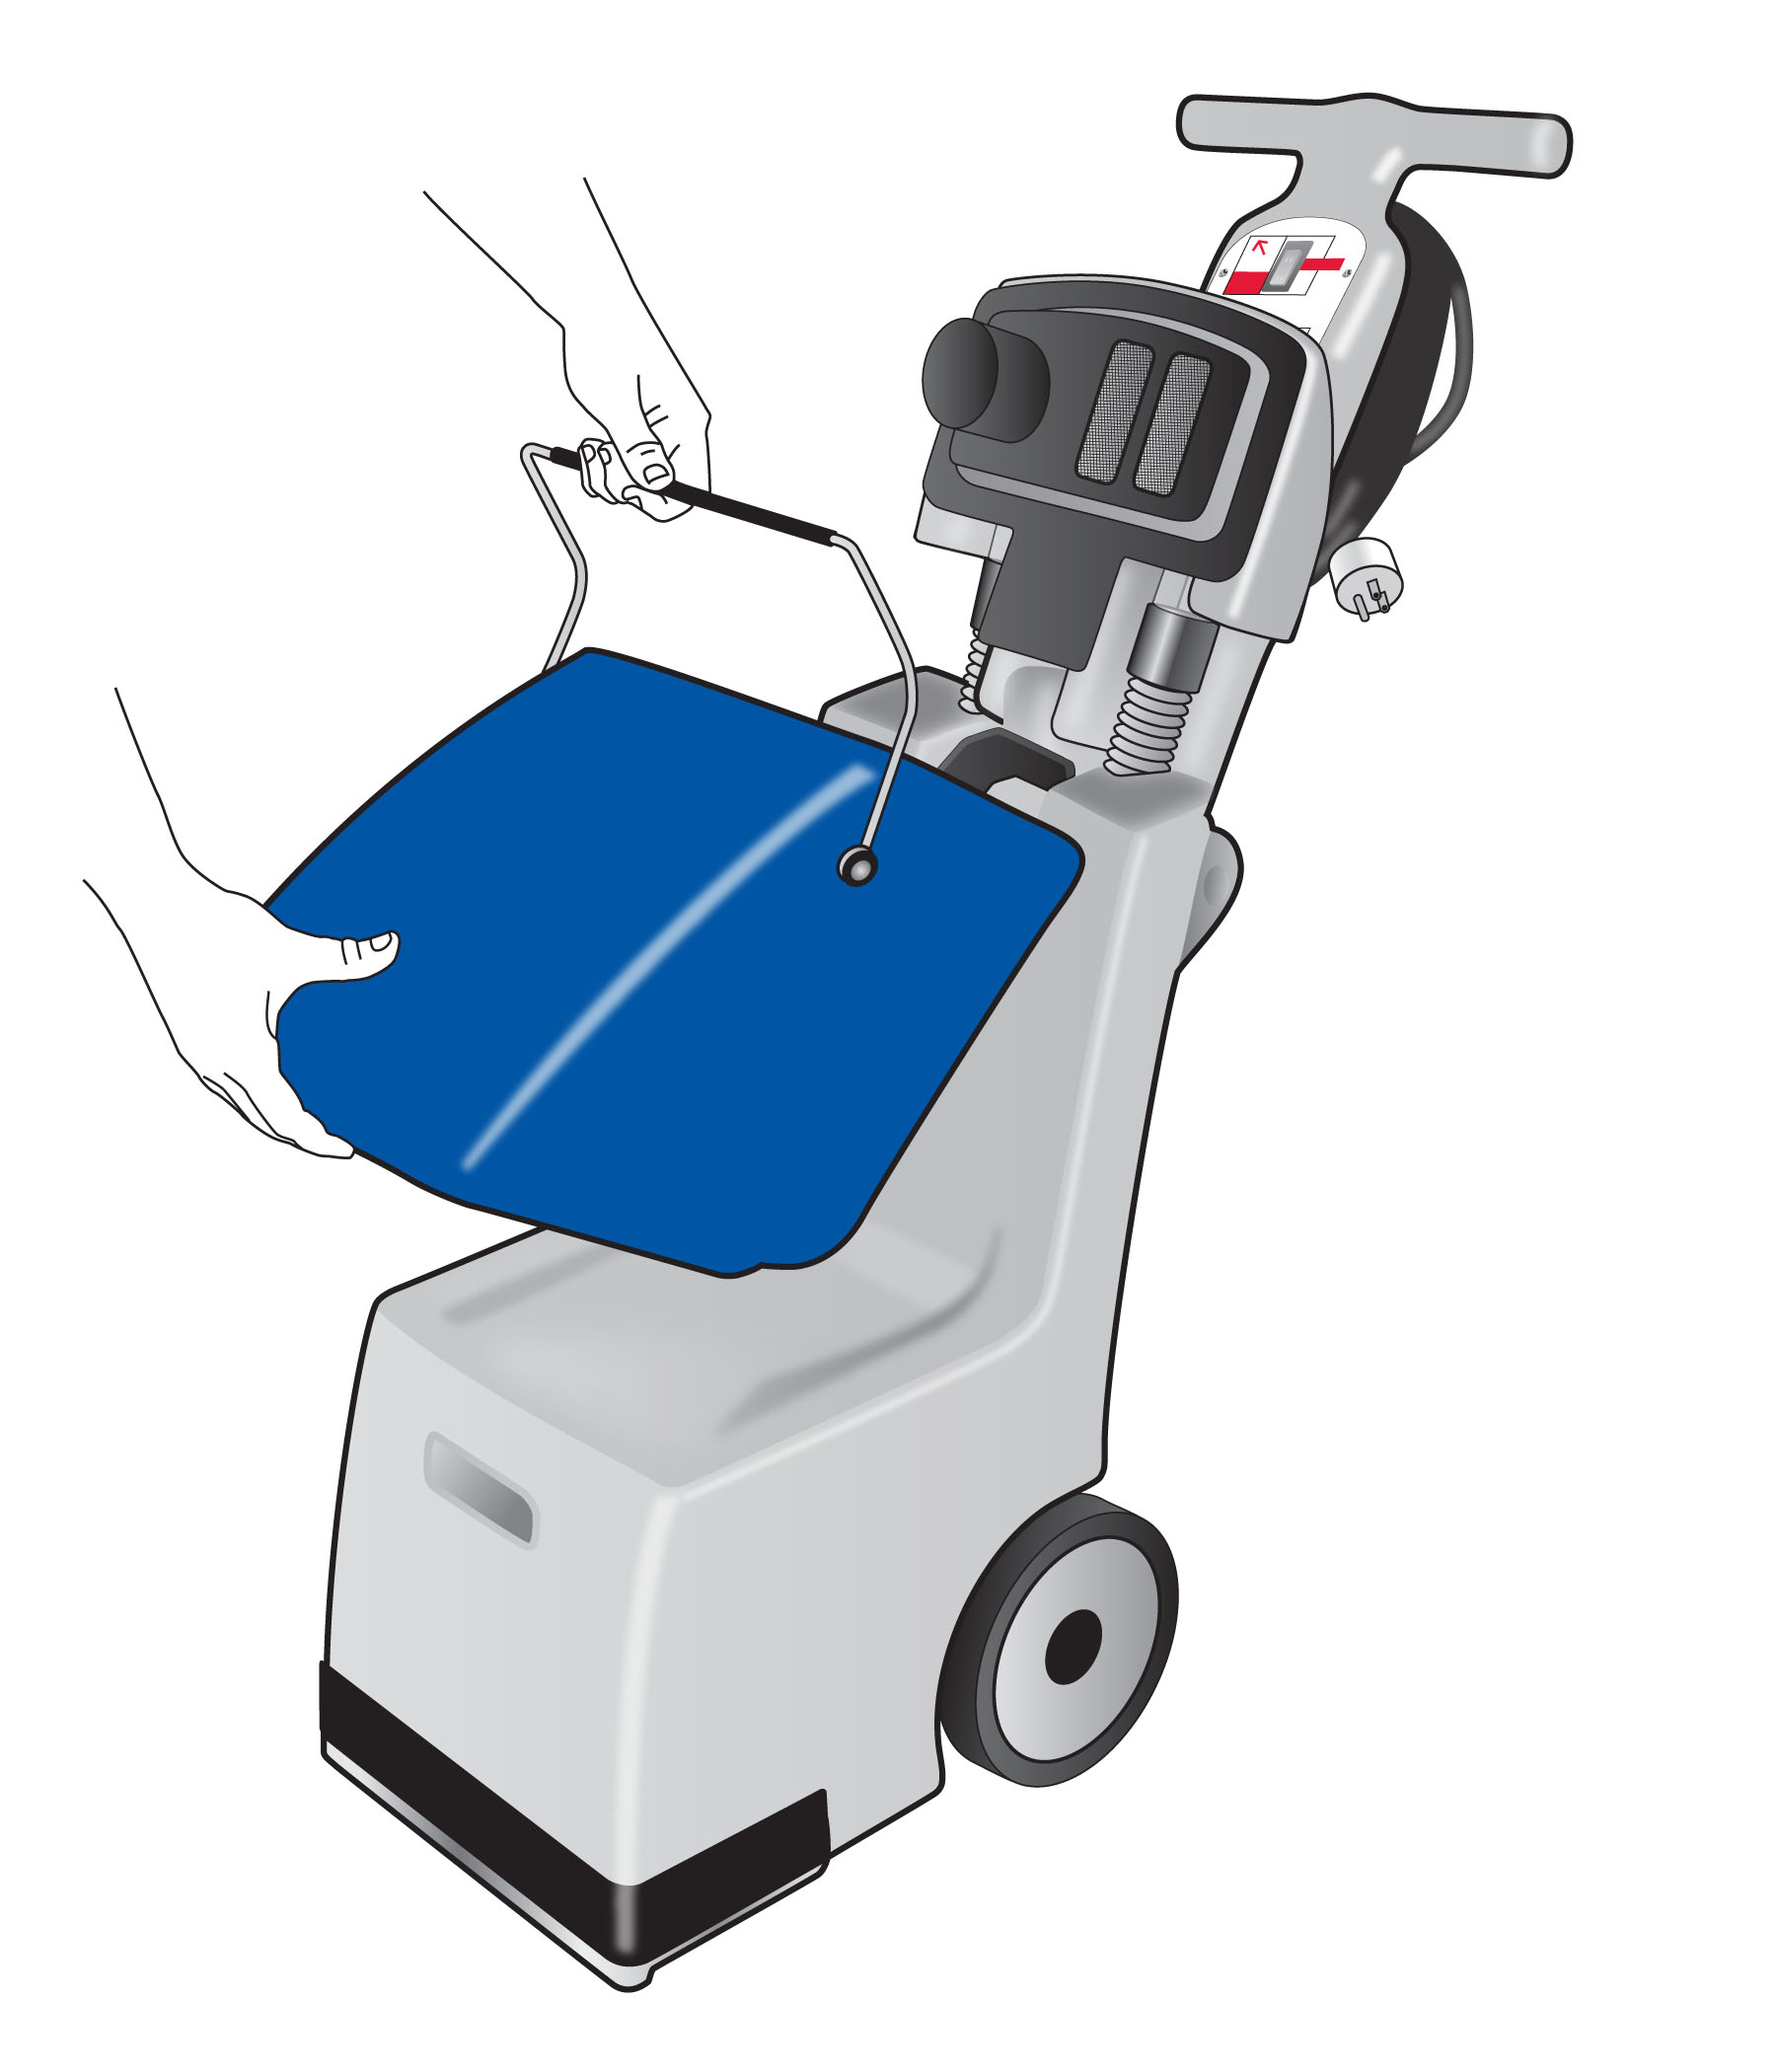
- Pull down Bucket Handle, lift the Lid and remove the Bucket.
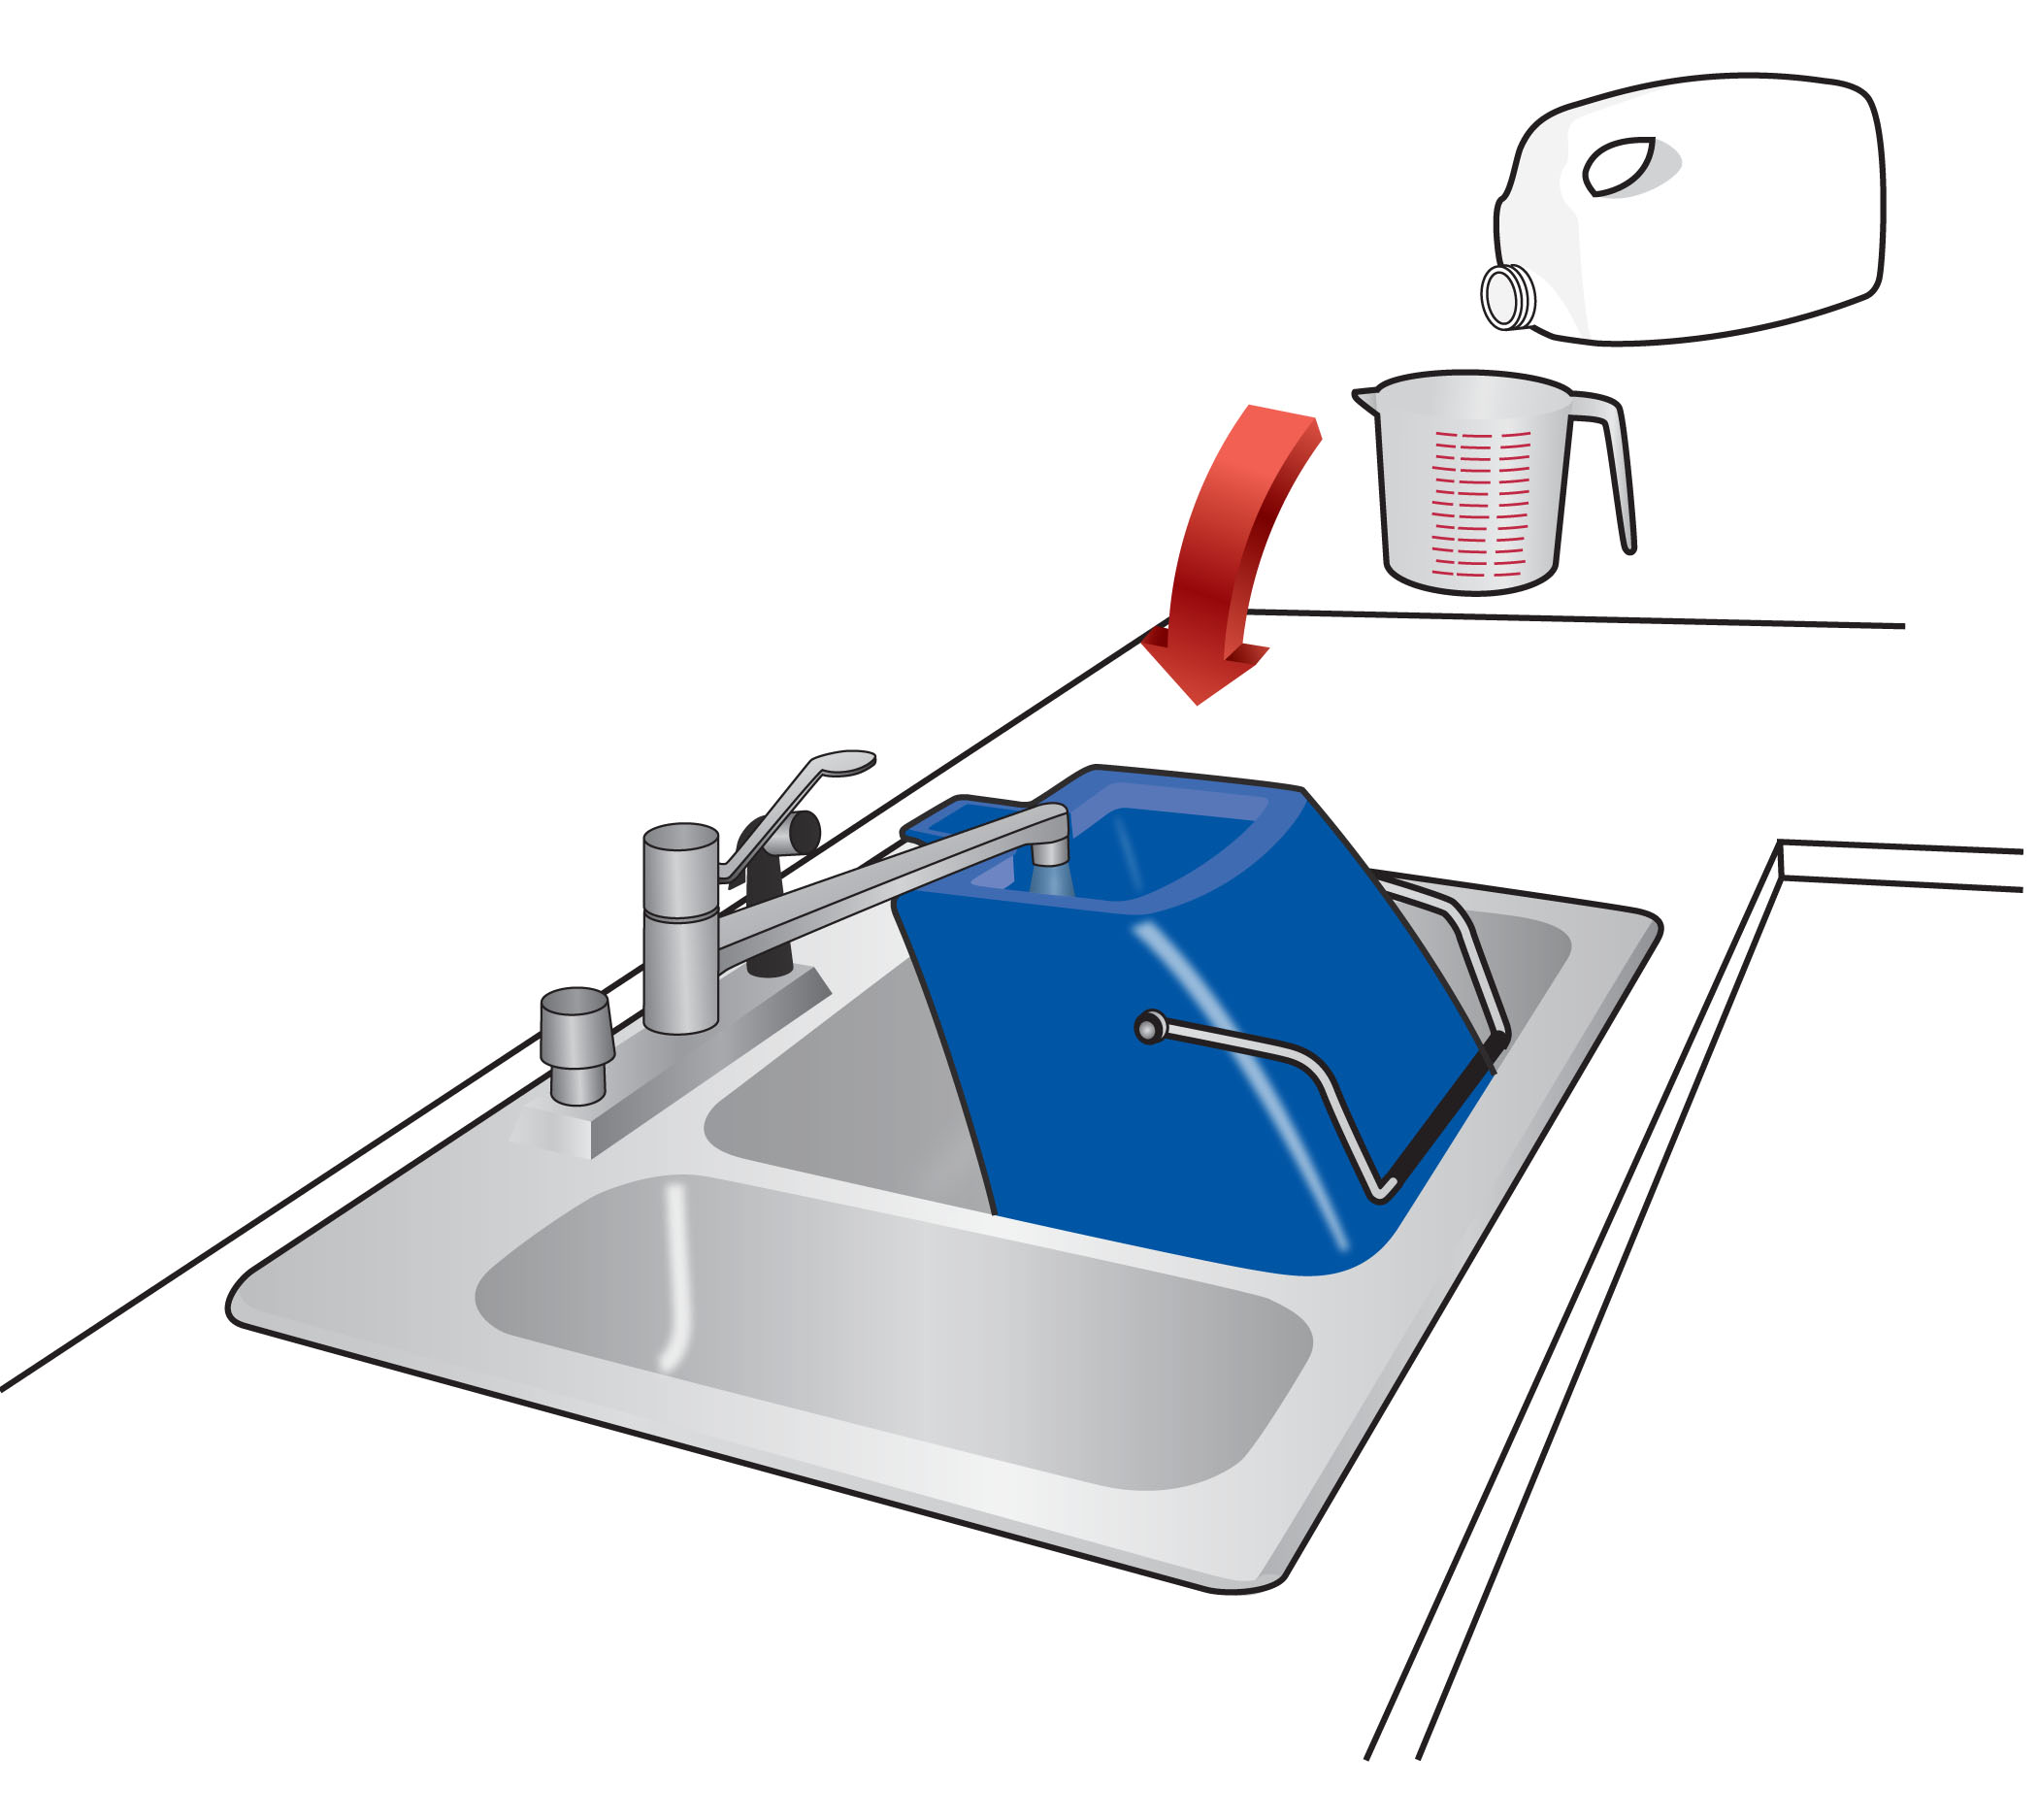
- Read and follow all 7 IN 1 Carpet Care Carpet Cleaning Directions or Upholstery Cleaning Directions. Mix 7 IN 1 with water in Bucket according to directions. See Test Colorfastness.
Note: Do not fill Bucket above top fill line.
- Do not use bleach or dye in this machine. User will be liable for all damages.
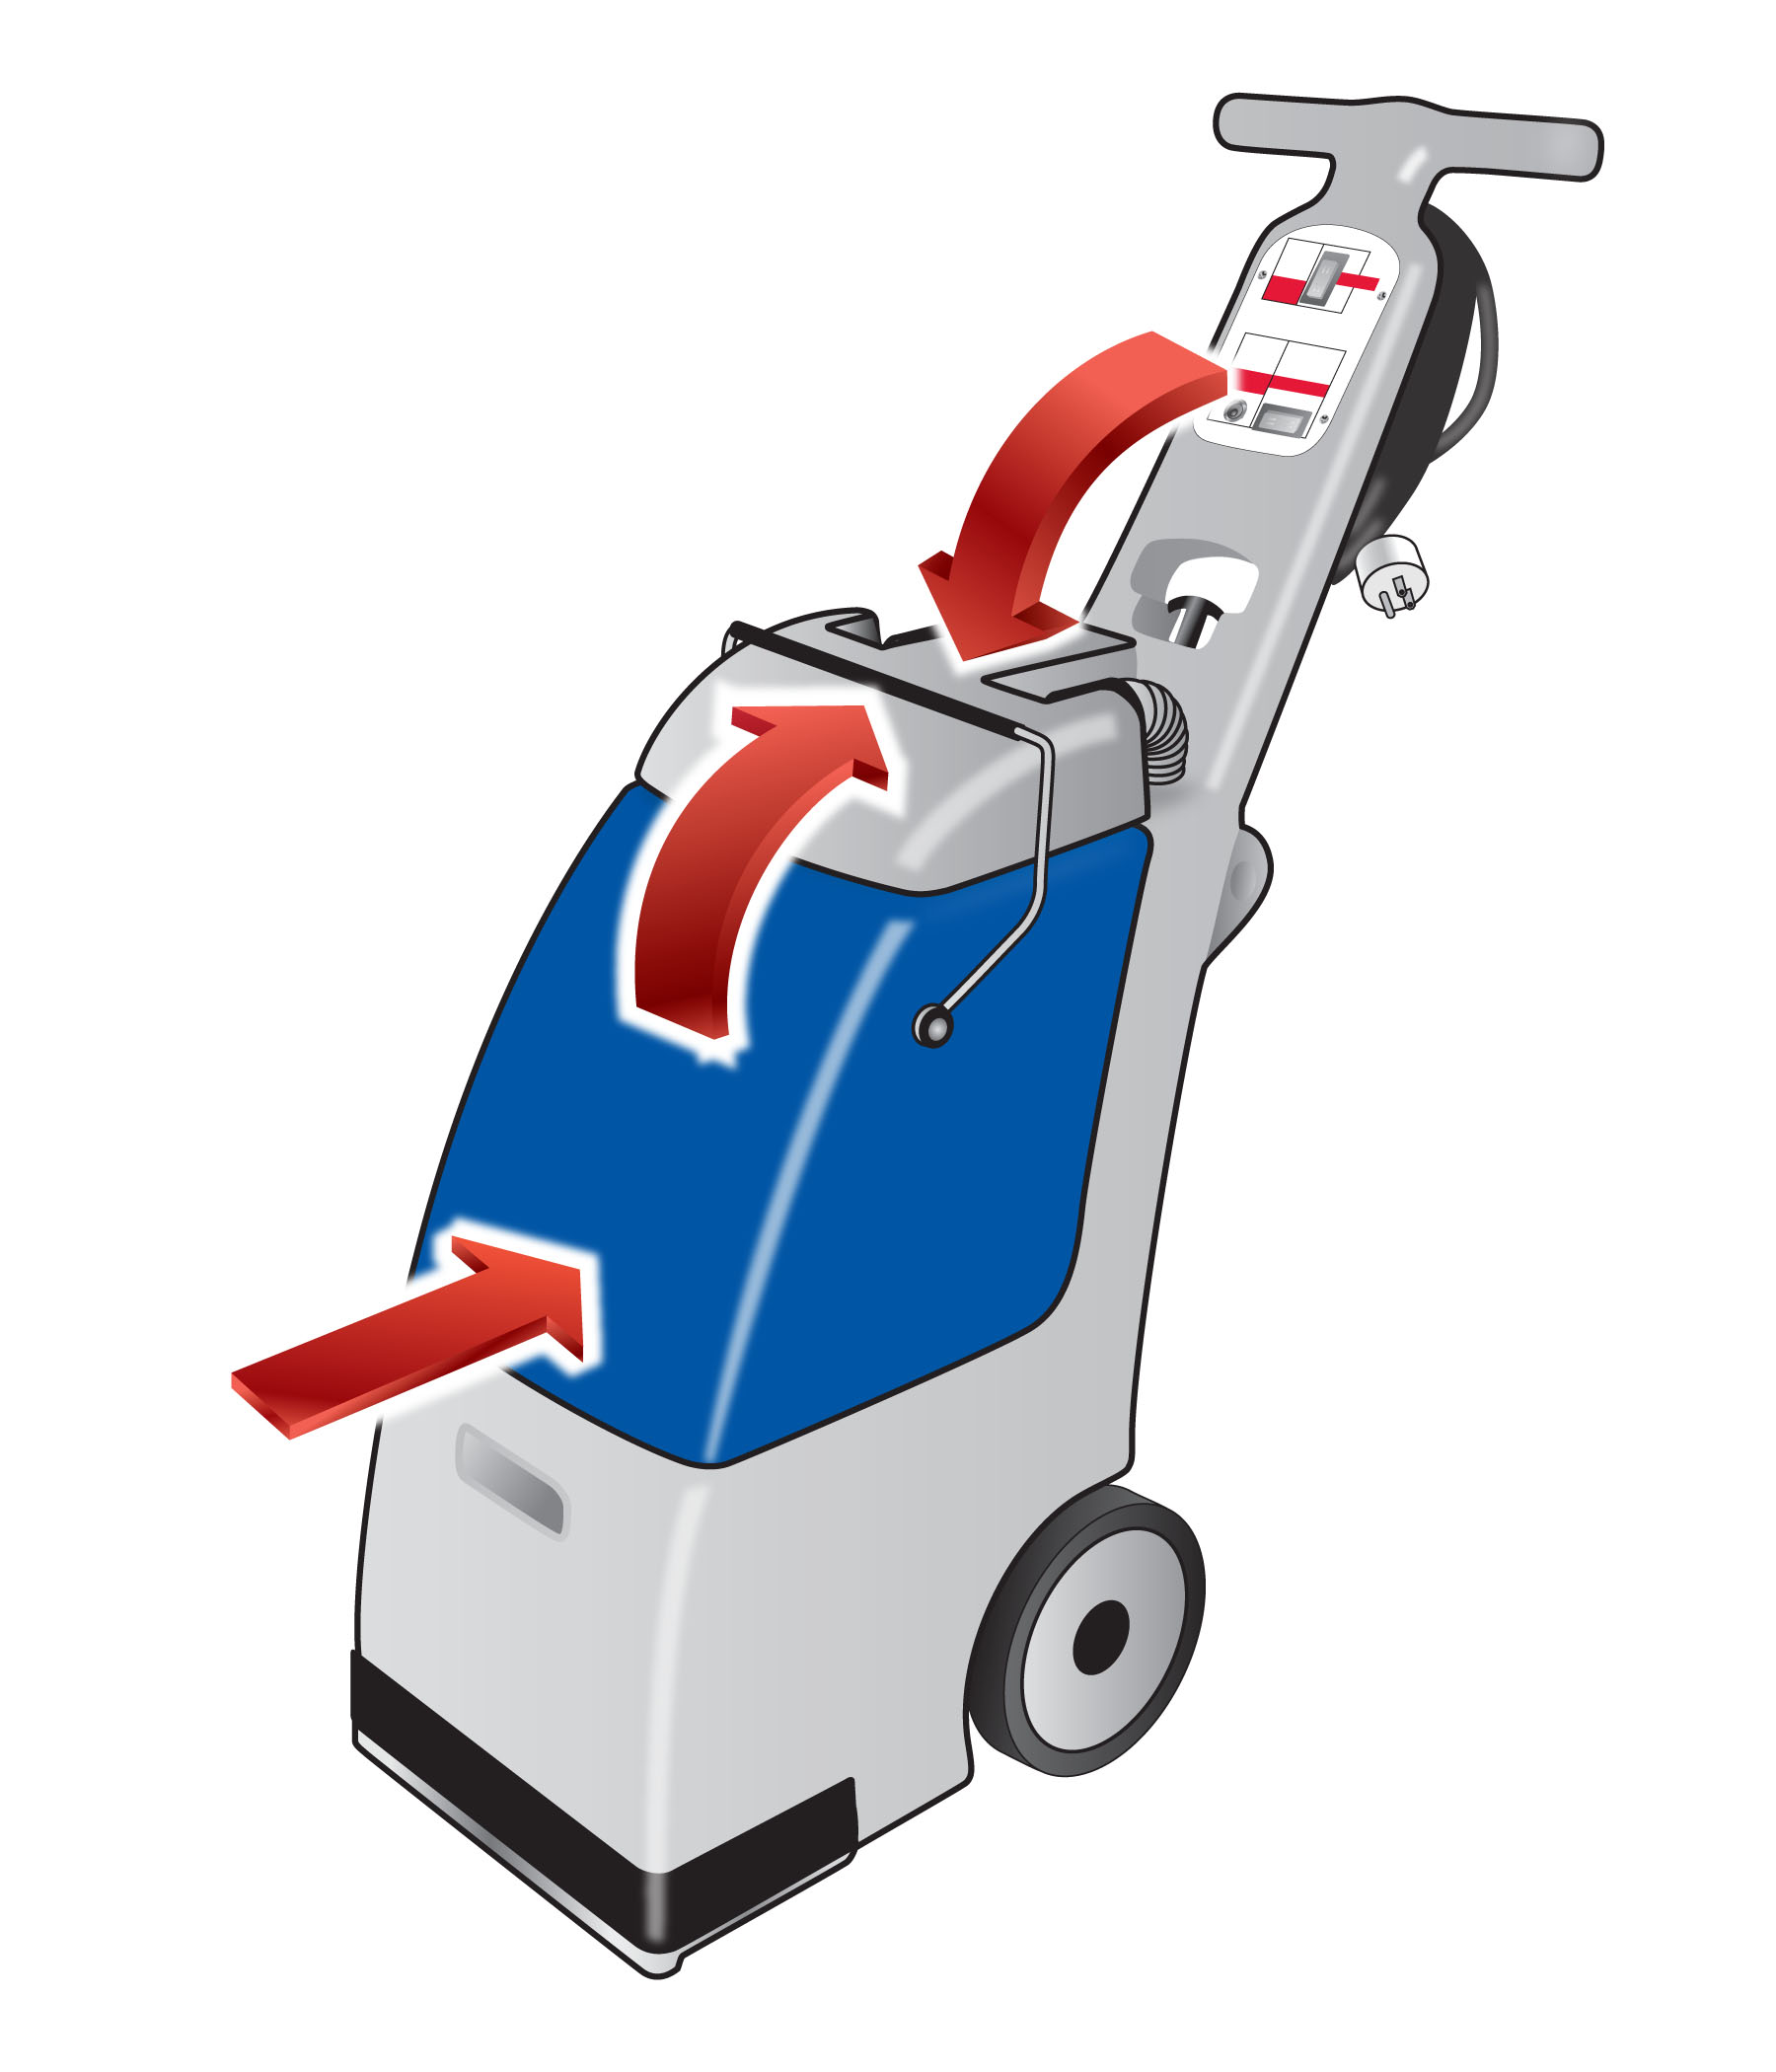
- Important: Pour contents of Bucket into machine Solution Tank.
- Return Bucket to Solution Tank, close Lid, and snap Bucket Handle into place.
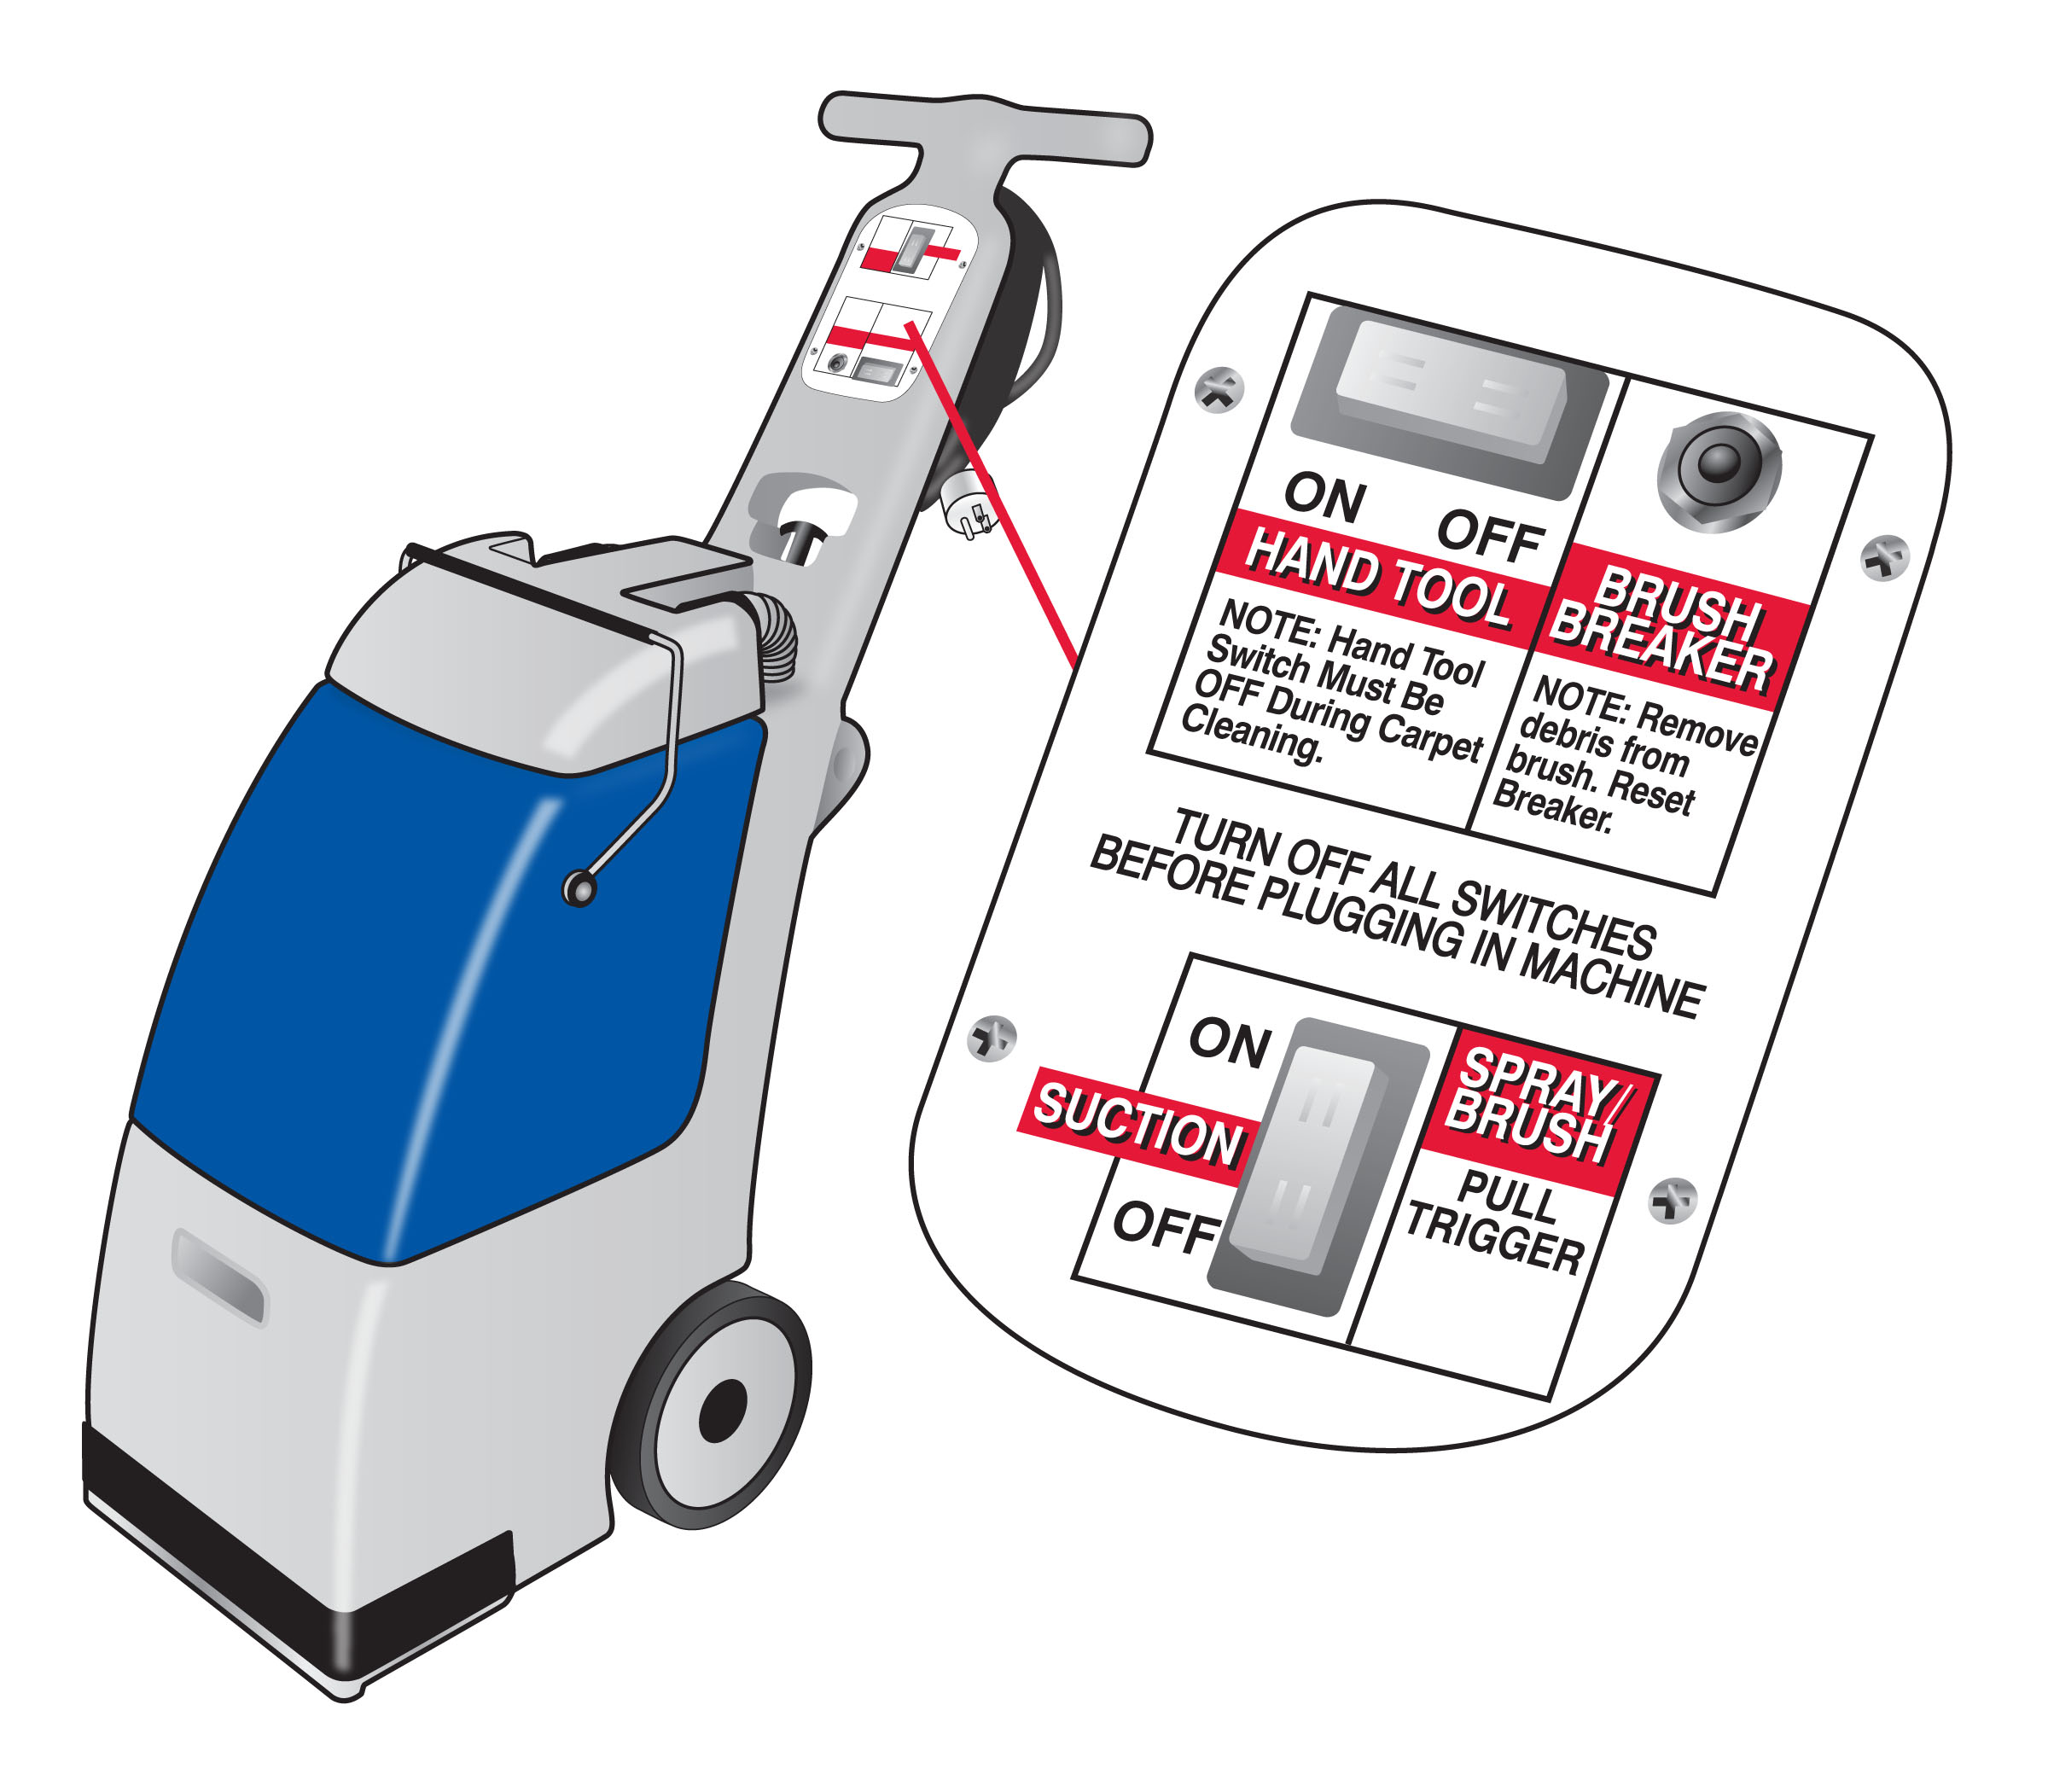
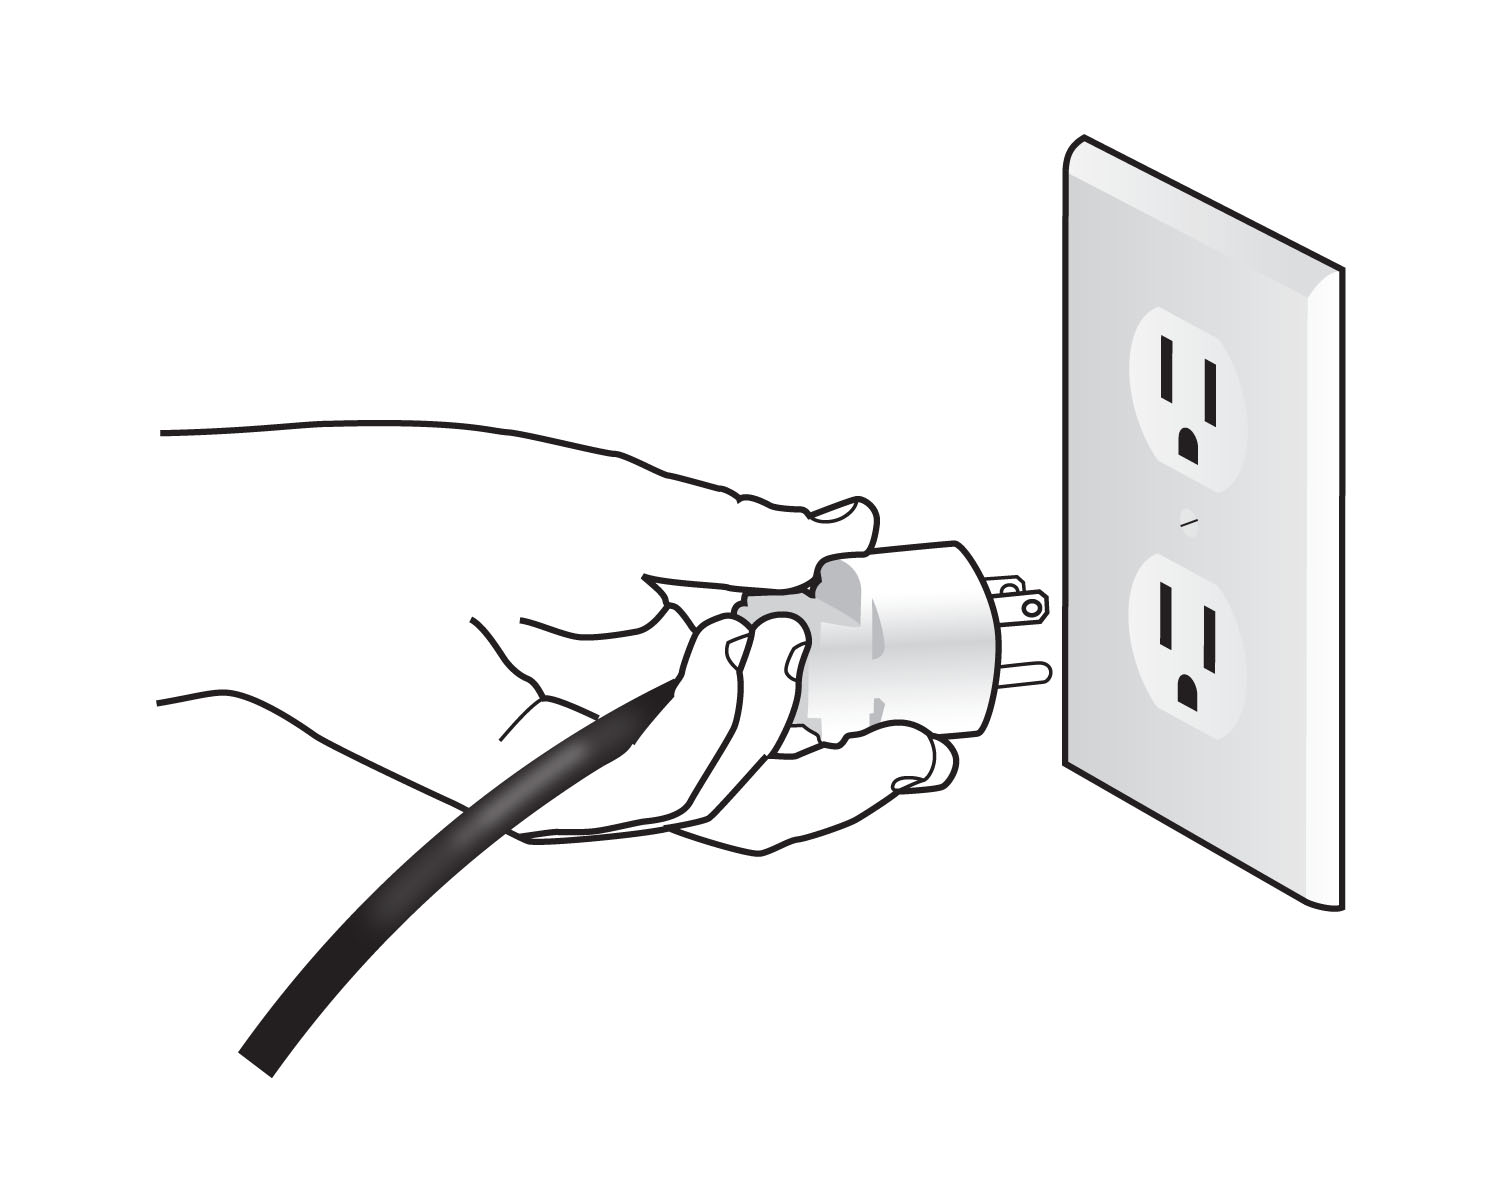
- Turn all switches OFF, plug in machine to a grounded outlet. See Grounding Instructions.
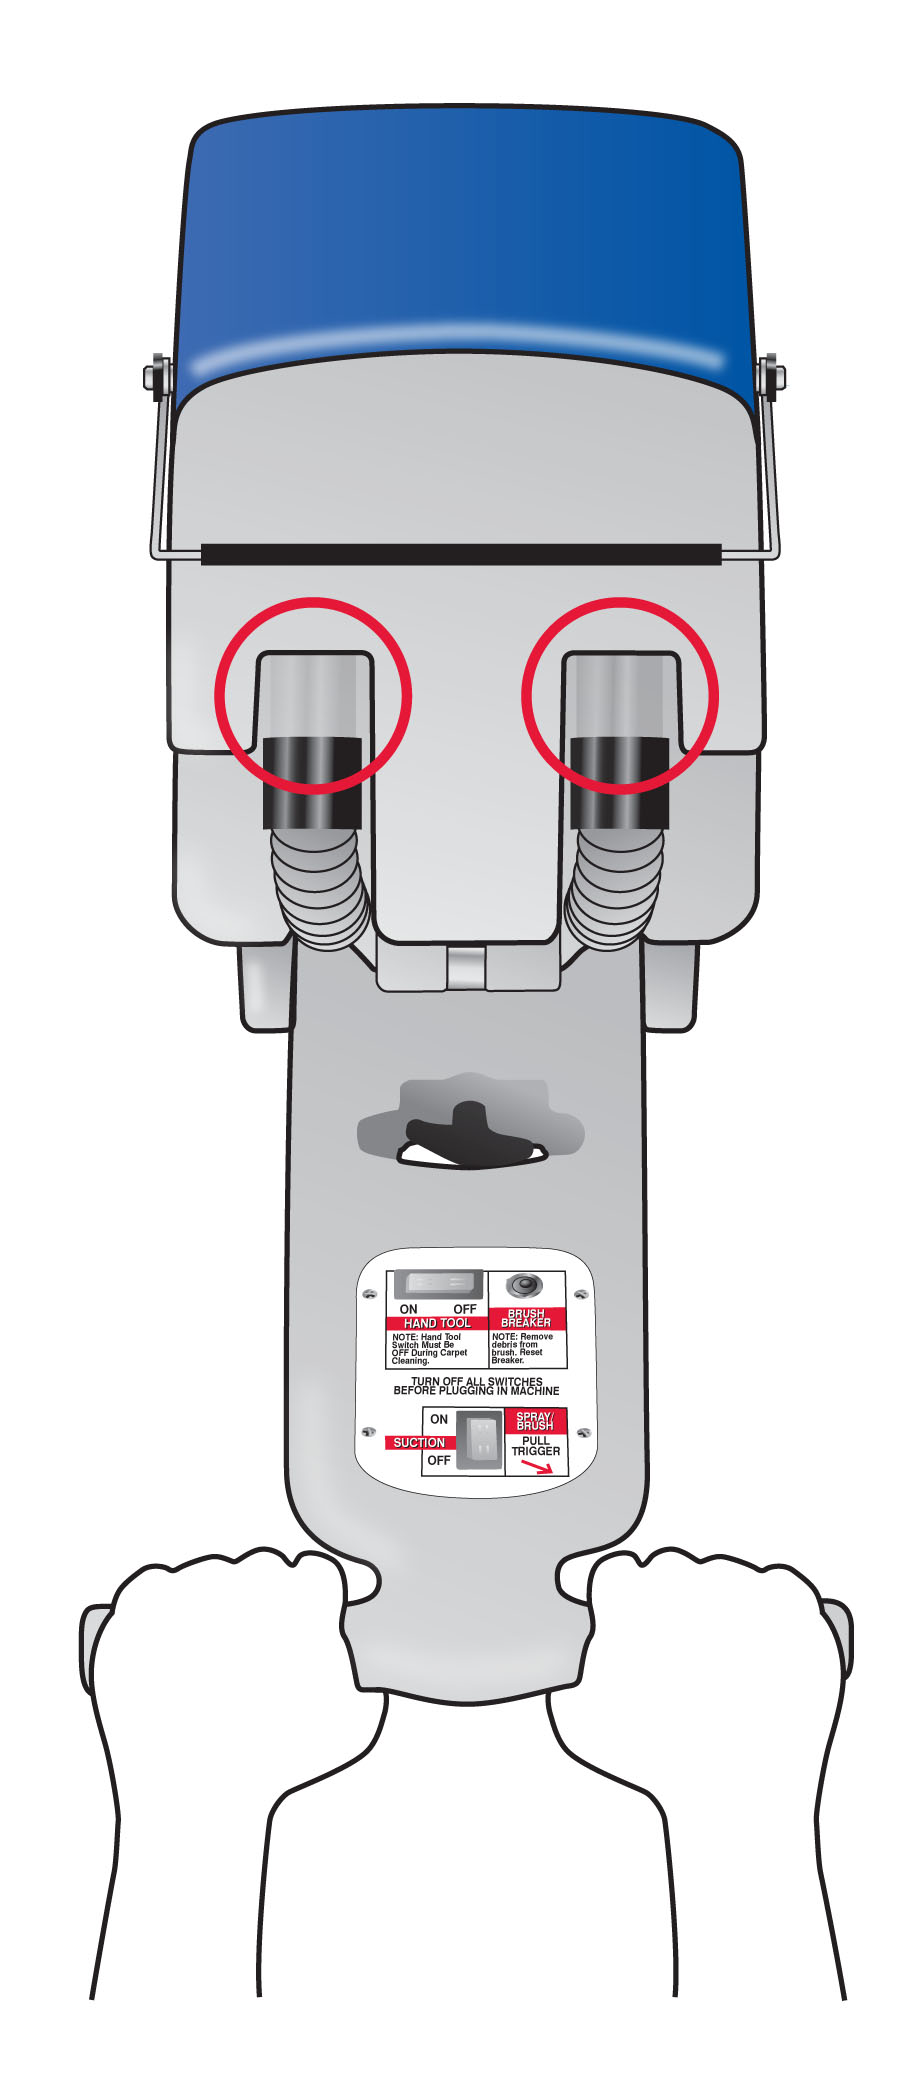
- For Carpet Cleaning: make sure the Solution and the Vacuum Hoses at the back of the machine are connected. For Vacuum Hoses, connect the two Black Vacuum Cuffs. For Solution Hose, pull down on the middle of the Brass Coupler. While holding down the Coupler, insert the machine Solution Hose. Release Coupler, then pull on the Solution hose to insure it is secured.
Cleaning Carpet
- Tilt the machine back and move into the starting position. Turn ON the Suction Switch. Note: Hand Tool Switch must be OFF. Pull the Spray/Brush Trigger and pull the machine backwards at a slow steady pace, about 1 foot per 2 seconds. Clean in approximately 5 foot strokes. Overlap strokes by 2 inches, releasing the Trigger 6 inches before ending each stroke. Keep the Suction Nozzle in firm contact with the carpet.

- Note: For best results, clean heavily soiled areas twice at right angles.
- Dirty water passes through the right Sight Tube while cleaning. When dirty water stops passing through the Sight Tube while cleaning, the machine is empty. Turn OFF the Suction Switch. Empty dirty water from the Bucket, and rinse the Bucket. Refill the machine.
- If foam or liquid appears in the left Sight Tube, empty the dirty water from the Bucket without refilling the machine.
Cleaning Stairs
- Use the Hand Tool to clean stairs. See Cleaning Upholstery to hook up the hand tool.
- Clean the upstairs rooms first, then the stairs.
- IMPORTANT: When cleaning the upper stairs, turn machine sideways so wheels are NOT facing forward, toward stairs. Be careful bringing the machine down wet stairs. Make sure to empty the Bucket and Solution Tank using the Drain Hose.
- Turn ON the Suction and Hand Tool Switches. Place Hand Tool Suction Nozzle on carpet and squeeze the Trigger while pulling backwards. Overlap cleaning strokes.
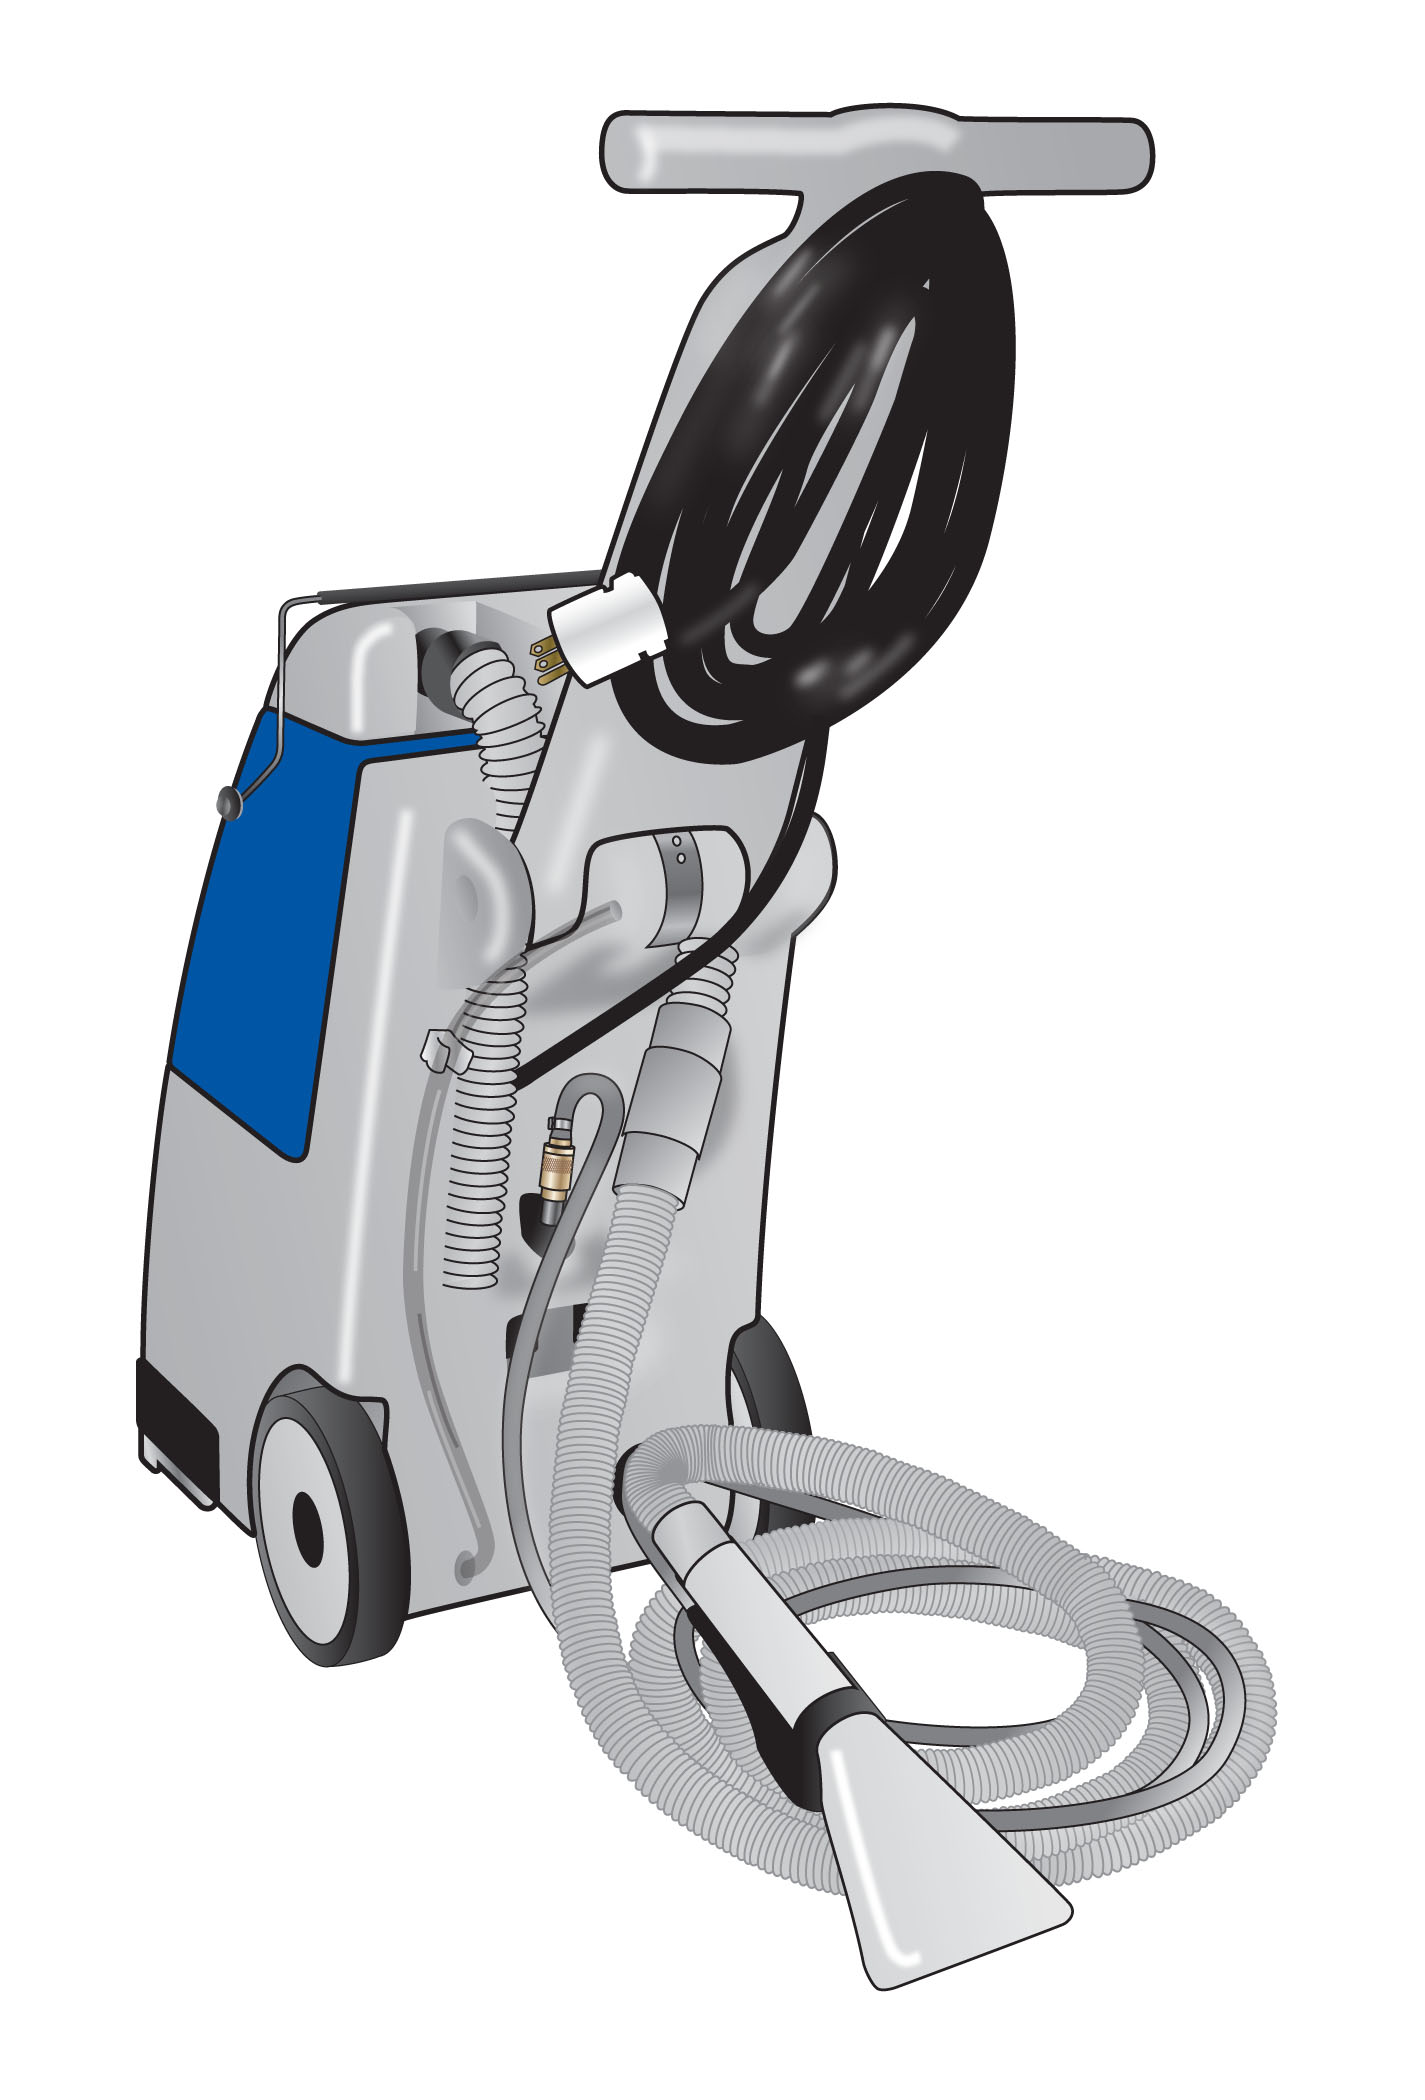
Cleaning Upholstery
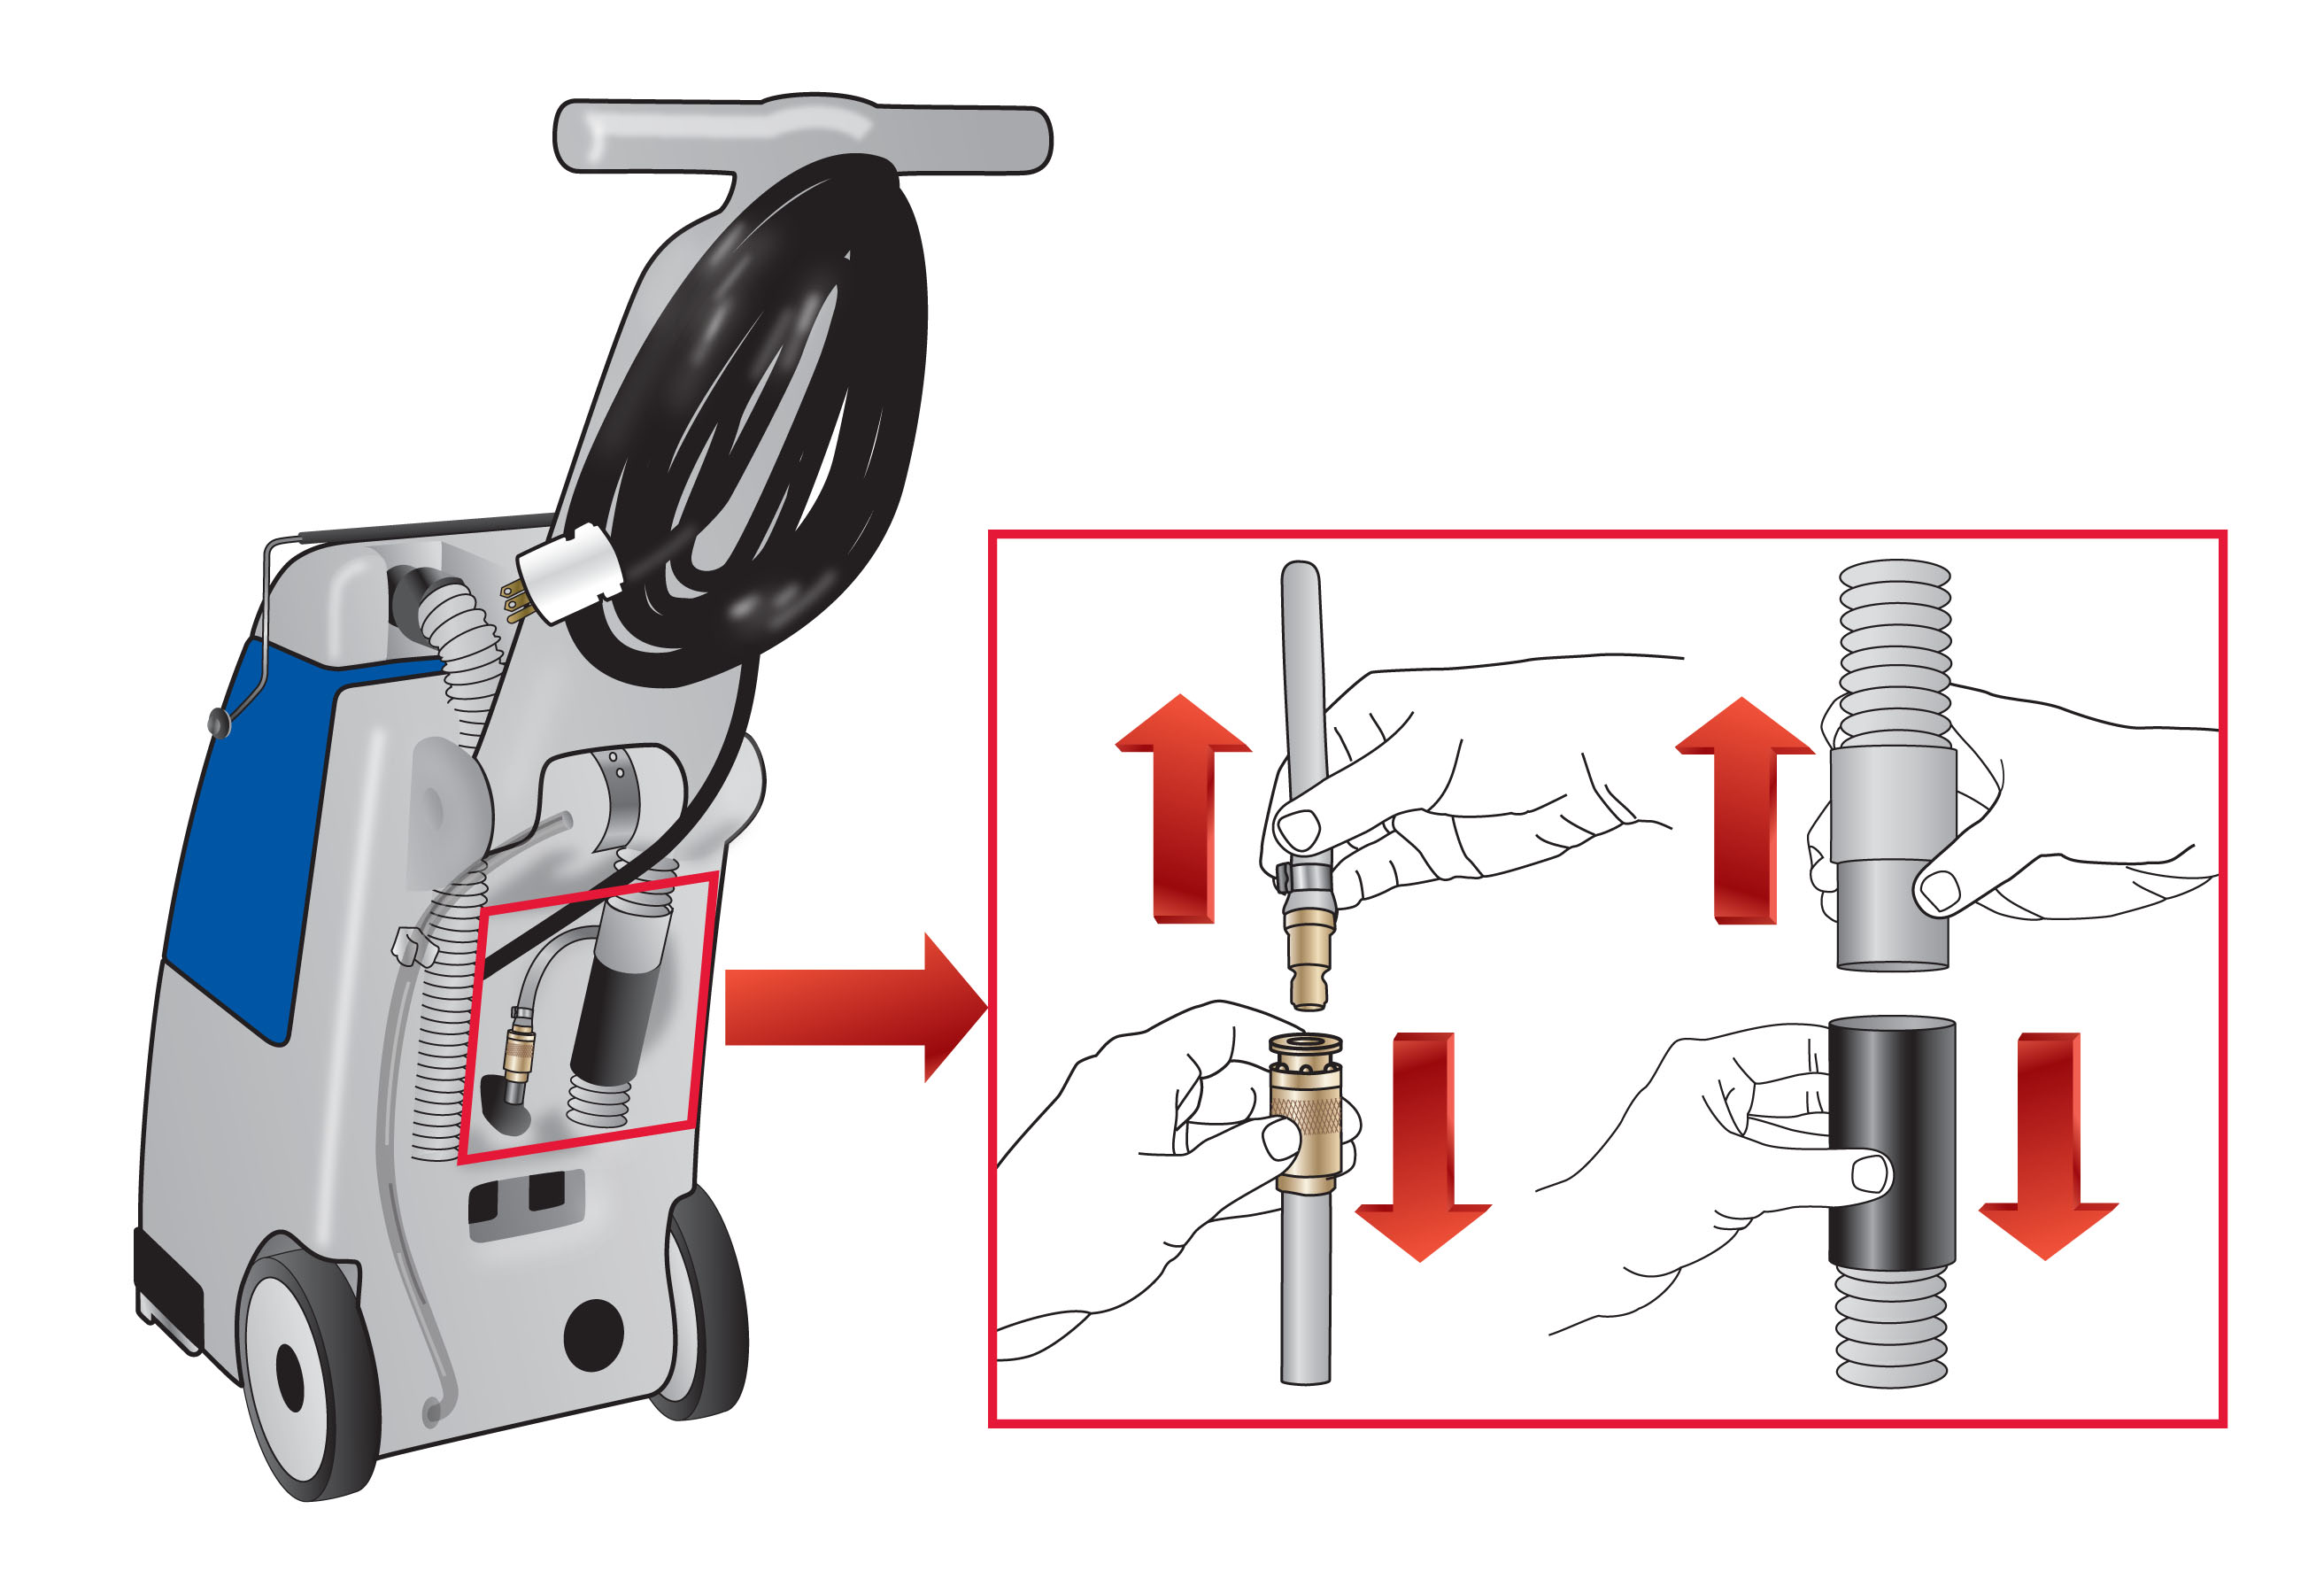
- Connect the Hand Tool to the Machine. Disconnect the machine Solution Hose by pulling down on the middle of the brass Coupler, the hose will release. While holding down the Coupler, insert the Hand Tool Kit Solution Hose. Release Coupler. Pull on the Solution hose to insure it is secured. Disconnect the grey and black Vacuum Cuffs at the back of the machine. Connect the grey Hand Tool Kit Cuff to the grey machine Cuff.
- WARNING: Do Not Use To Clean Haitian Cotton!
- Test Upholstery Color Fastness. Apply the mixed cleaning solution to an inconspicuous area of upholstery. After one minute, blot with a white cloth and check for color transfer. If no color transfers, proceed with cleaning. If color transfers, proceed at your own risk.
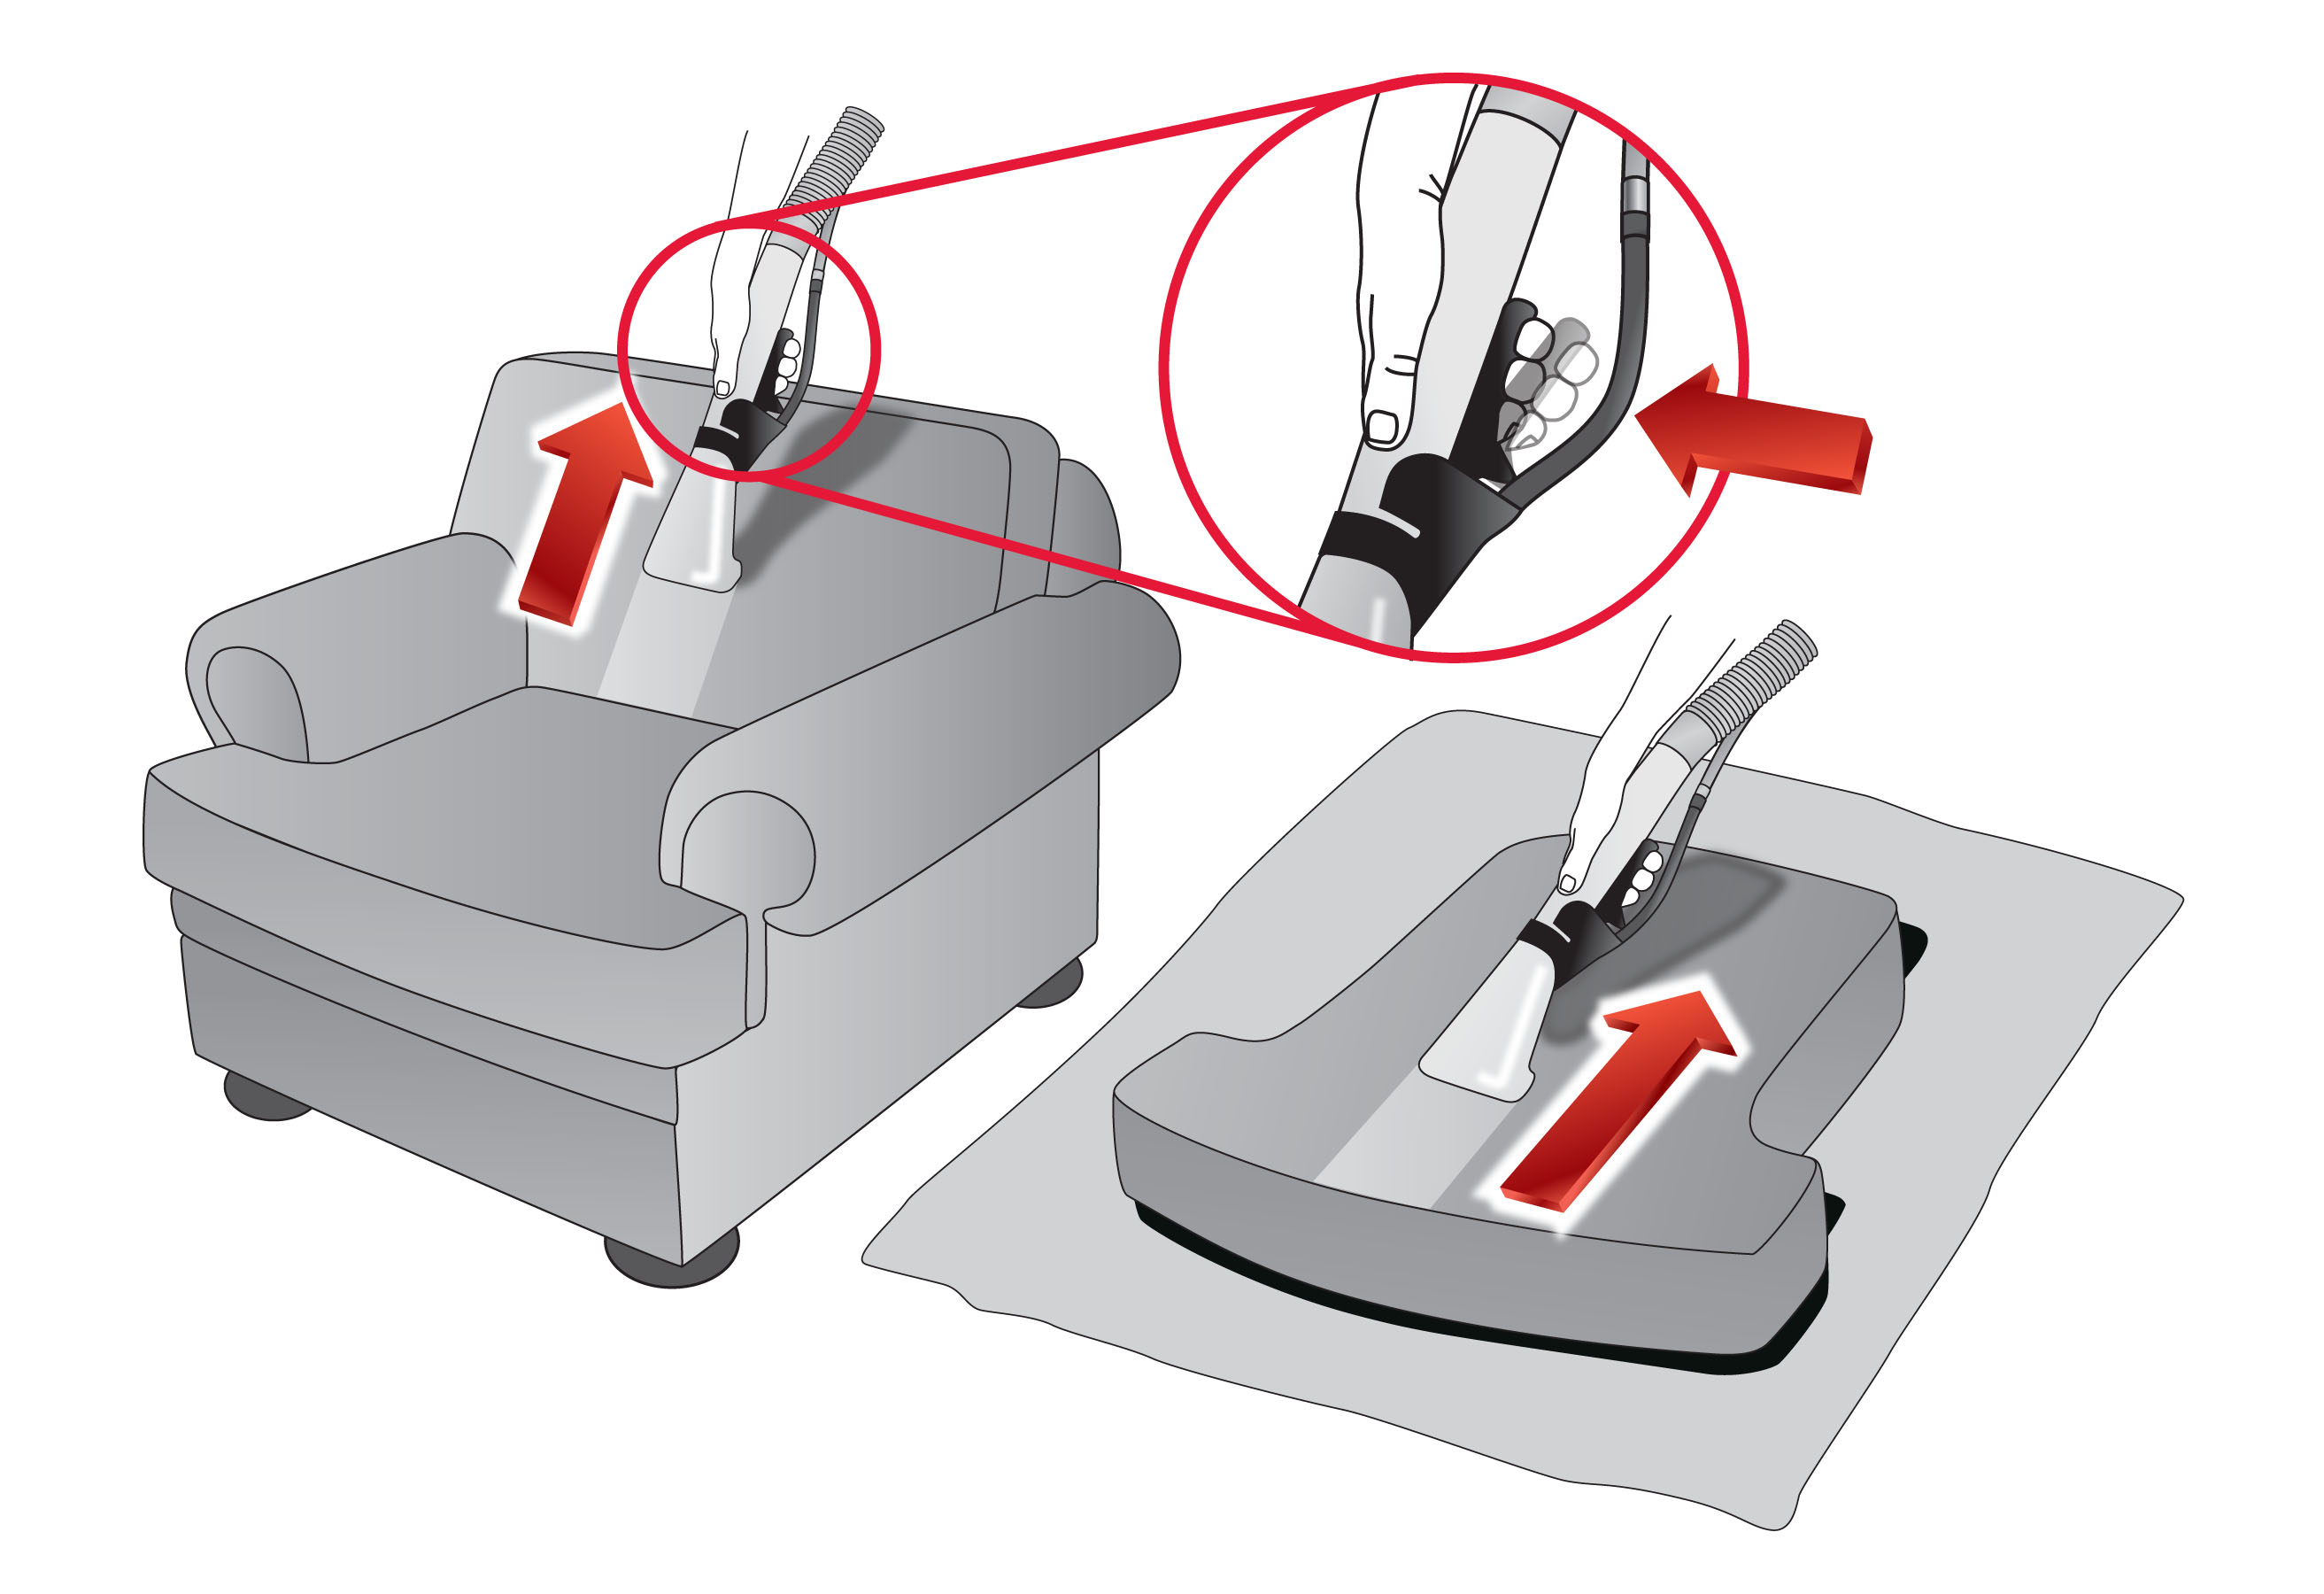
- Turn ON the Suction and Hand Tool Switches. Squeeze the Hand Tool Trigger as you pull up or back with overlapping even strokes.
- Clean cushions separately on a white sheet or towel on the floor. Stand the cushions up in an A-frame to dry.
When You're Finished
- Empty Bucket of used cleaning solution.
- Drain unused solution from Solution Tank using the clear Drain Tube at the back of the unit.
- Dispose of drained solution and rinse Bucket thoroughly.
- Wipe hair and debris from the Lid Filter.
- Wipe off the exterior of the machine with a damp towel.
- Remove fibers and hair from the Brush and wipe the Brush Chamber.
- Clean out the Vac Nozzle with a hanger if necessary.
Troubleshooting
Loss of Electrical Power
- Check if the Switches are in the “ON” position.
- Check if the Electrical Cord is plugged in.
- Check the circuit breakers or fuse box in your building.
- Try using a different electrical outlet.
Loss of Vacuum
- Make sure the Suction Switch is in the “ON” position.
- Make sure the Lid is firmly seated down with the Bucket Handle snapped into place.
- Make sure the Hose at the back of the machine is connected.
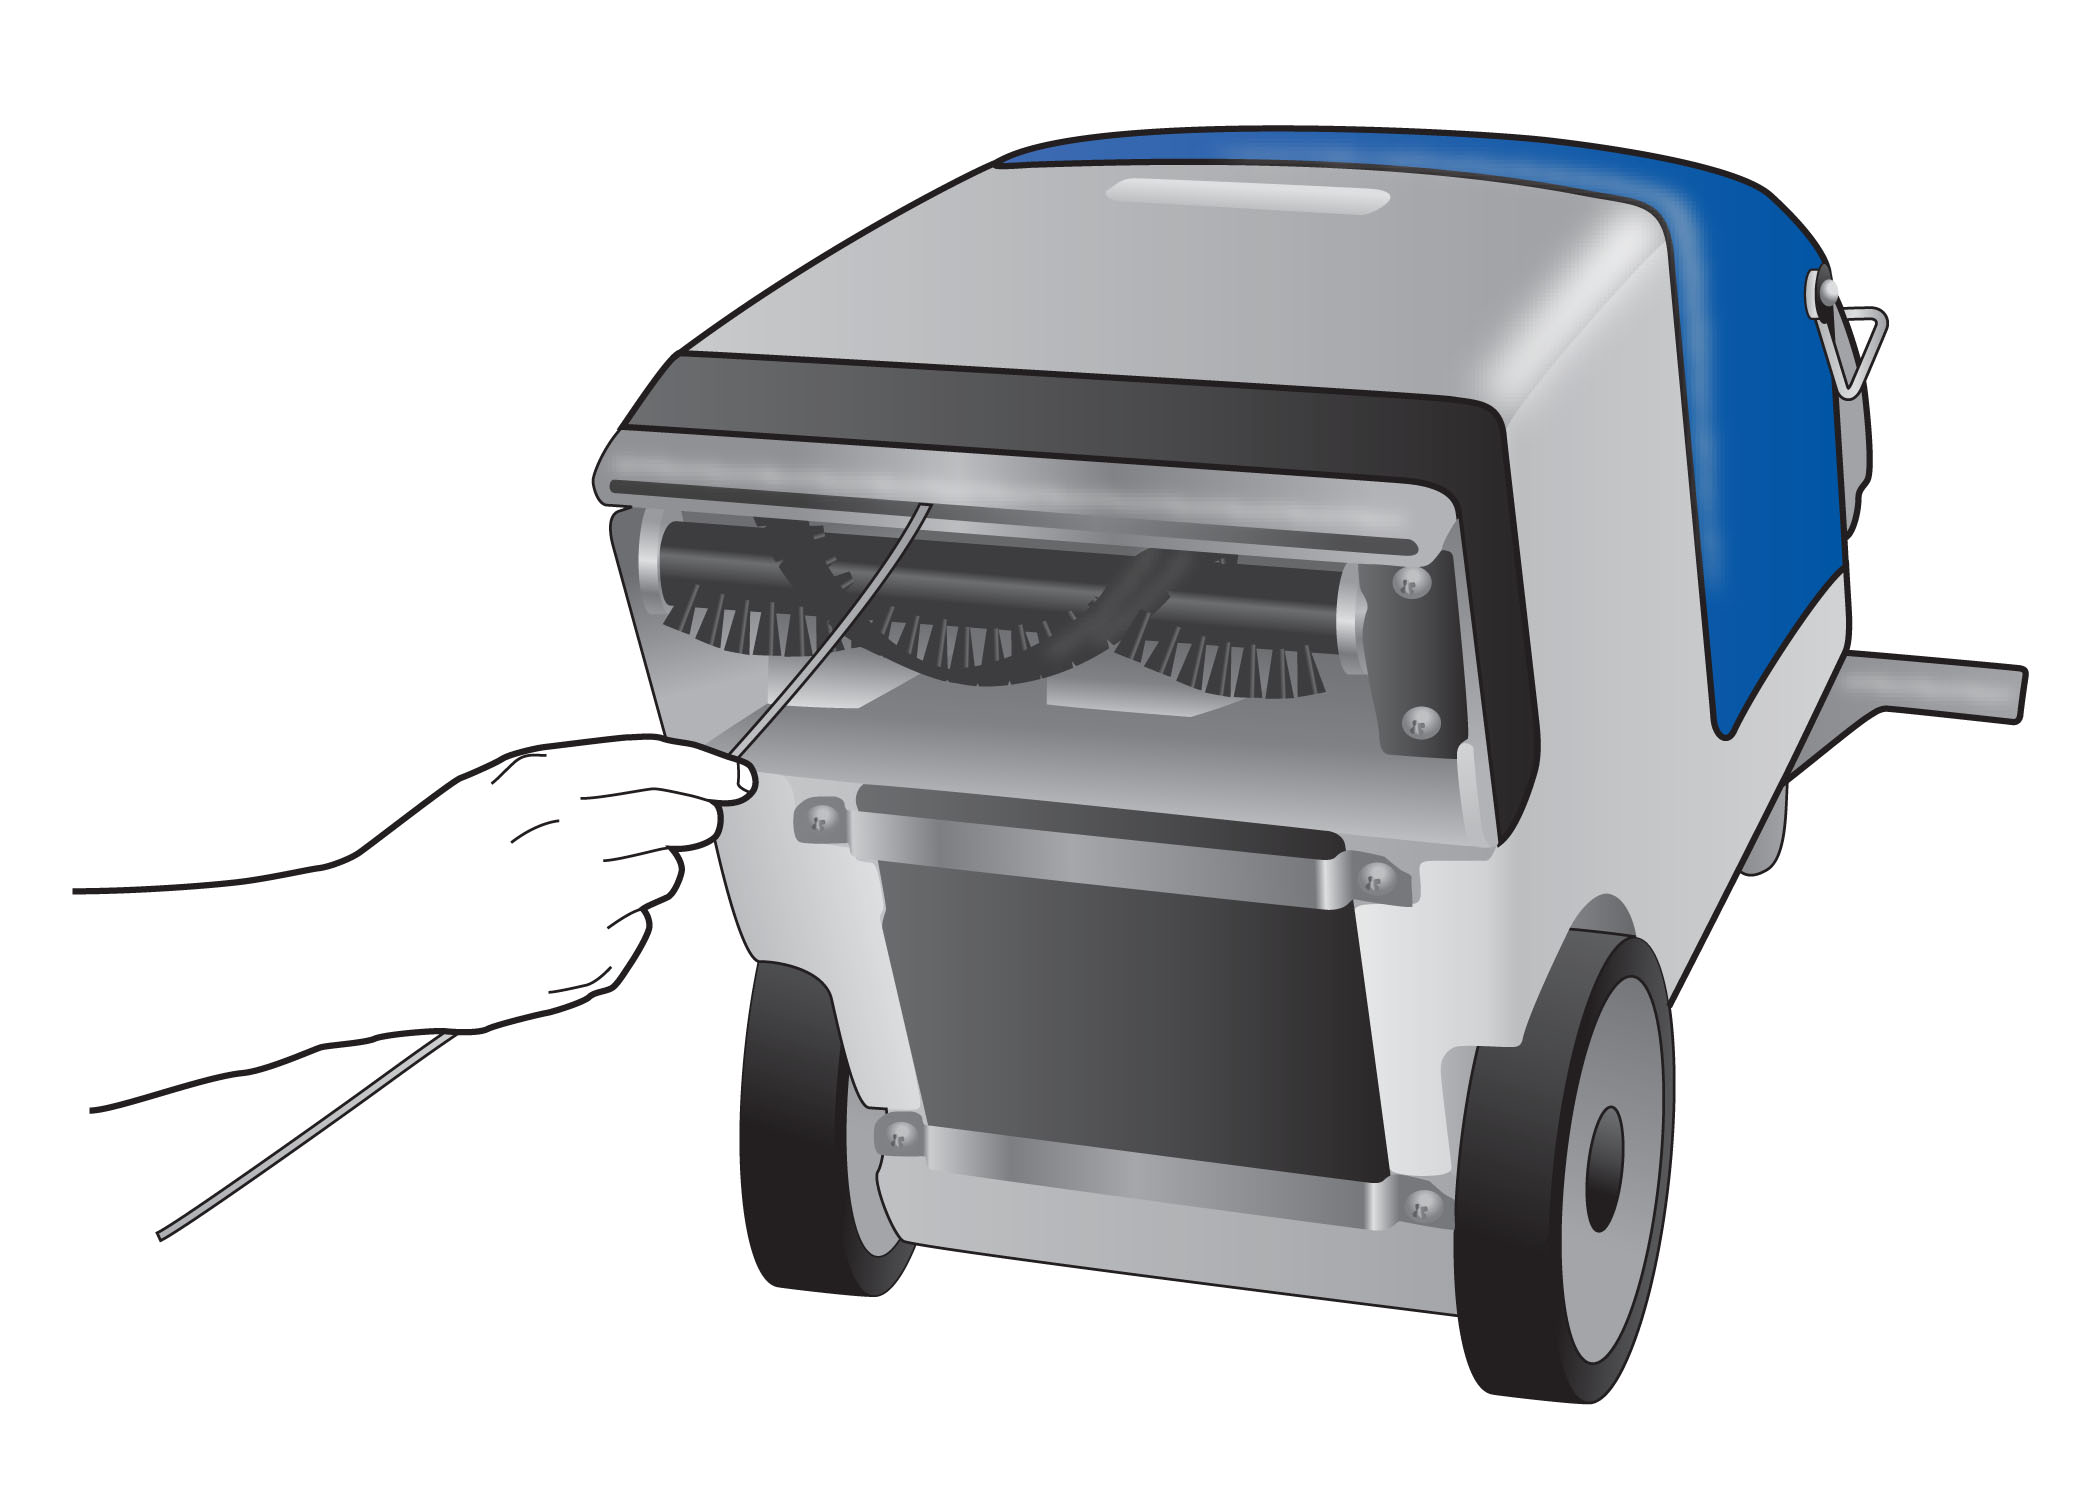
- The Vacuum Nozzle may be stopped up with lint. Turn OFF the machine. Unplug and empty the machine of liquid. Tilt machine back and remove lint with a bent hanger. (See diagram)
Water Pressure
- Make sure the cleaning solution was poured from the blue Bucket into the grey Solution Tank.
- Make sure you are not out of cleaning solution.
- Check if the Solution Hose is connected at the back of the machine. (See Preparing Machine-Last Bullet Point)
- Make sure you are squeezing the Spray/Brush Trigger while cleaning carpet; or the Hand Tool Switch is ON while using the Hand Tool.
Brush Not Working
- Make sure you are squeezing the Spray/Brush Trigger.
- Unplug the machine and empty all the liquid. Tilt the machine back and remove the string, lint and hair from the Brush until the Brush turns freely. Reset the Circuit Breaker on the machine Switch Panel located on the Handle.
Foam or Dark Liquid Emitting From Machine
- If foam or liquid is emitting from the back of the machine, it is just discharging excess foam. Turn the machine OFF, lift the Lid and empty the Bucket. DO NOT refill the machine. Replace the Lid, snap the Bucket Handle into place. Place a towel at the back of the machine and turn the Suction Switch ON for two minutes. Immediately use the machine to clean the foam or liquid off the carpet.